Indulge in the Festive Spirit with Our Irresistibly Easy Christmas Red Velvet Cheesecake Recipe
Are you ready to impress your friends and family this holiday season? Dive into the festive spirit with our easy-to-follow Christmas Red Velvet Cheesecake recipe! This delightful dessert combines creamy cheesecake and rich red velvet flavors, making it perfect for your holiday feasts. Whether you’re hosting a gathering or simply treating yourself, this cheesecake is sure to be a showstopper. Let’s make your festive feasts unforgettable!
Why You’ll Love This Recipe
This Christmas red velvet cheesecake isn’t just any dessert; it’s a celebration on a plate! Here are five reasons why this recipe will become a holiday favorite:
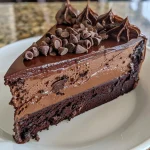
- Visually Stunning: The vibrant red color of the cheesecake layered with a creamy filling makes it an eye-catching centerpiece for your holiday table.
- Decadent Flavor: The combination of rich cocoa powder and cream cheese delivers a flavor explosion that’s both festive and comforting.
- Easy to Make: With straightforward steps and minimal ingredients, even kitchen novices can create this stunning dessert without stress.
- Make-Ahead Friendly: Prepare this cheesecake a day in advance to save time on the big day without sacrificing flavor or texture.
- Customizable: Personalize your cheesecake with various toppings and mix-ins to cater to your guests’ preferences.
Christmas Red Velvet Cheesecake Ingredients
Gathering the right ingredients is key to making this delicious cheesecake. Here’s what you’ll need:
- 24 Oreo Cookies (Crushed): The base of your crust, providing a rich chocolate flavor. Swap with gluten-free cookies if needed!
- 1/2 cup Unsalted Butter (Melted): Helps bind the crust together while adding rich flavor.
- 16 oz Cream Cheese (Softened): The star of the filling, ensuring a smooth and creamy texture.
- 1 cup White Sugar (Adjust to taste): Sweetens the cheesecake, balancing the flavors perfectly.
- 1 cup Heavy Whipping Cream (Or Cool Whip): Adds lightness and airiness to the filling; substitute with whipped topping for convenience.
- 1 tsp Vanilla Extract (Or peppermint extract): A dash of flavor that enhances the overall taste.
- 1/4 cup Cocoa Powder (Adjust to taste): Adds that signature chocolate flavor; feel free to increase for a richer taste!
- 1 tbsp Red Food Coloring (Adjust to desired shade): Ensures the cheesecake has that festive red hue.
- 1/2 cup Christmas Sprinkles: For that extra festive touch on top!
- 1 cup Whipped Cream (Fresh or store-bought): A crowning glory that adds sweetness and creaminess.
- 1/2 cup Mini Oreos (For decoration): Perfect for a fun and festive finishing touch.
How to Make Your Christmas Red Velvet Cheesecake

Now that you have all your ingredients ready, let’s dive into the steps to create this delightful dessert:
- Prepare the Crust: In a mixing bowl, combine the crushed Oreo cookies and melted butter until well blended. Press the mixture firmly into the bottom of a springform pan to form an even layer. Bake for 10 minutes at 350°F (175°C) and allow it to cool.
- Make the Cheesecake Filling: Using an electric mixer, beat the softened cream cheese and sugar together until smooth. Add the heavy whipping cream, vanilla extract, cocoa powder, and red food coloring, mixing until fully combined. The mixture should be light and fluffy.
- Combine: Pour the cheesecake filling over the cooled crust, spreading it evenly. Tap the pan gently to release any air bubbles.
- Chill: Cover the cheesecake with plastic wrap and refrigerate for at least 4 hours, or preferably overnight. This helps the cheesecake set and allows the flavors to meld beautifully.
- Top It Off: Before serving, add whipped cream, sprinkle the Christmas sprinkles, and decorate with mini Oreos for a festive flair!
Pro Tips for Perfecting Your Cheesecake
These expert tips will help you achieve the perfect cheesecake:
- Room Temperature Ingredients: Ensure cream cheese and eggs are at room temperature to achieve a smooth and creamy filling without lumps.
- Don’t Overmix: When combining the filling ingredients, mix just until smooth to avoid incorporating too much air which can create cracks.
- Water Bath Method: For a creamier texture, consider using a water bath during baking. Wrap the bottom of your springform pan with aluminum foil to prevent water from seeping in.
- Chill Overnight: Allowing the cheesecake to chill overnight enhances the flavors and improves the texture.
- Use Gel Food Coloring: For a deeper, richer red hue, opt for gel food coloring instead of liquid.
- Storage Tips: Keep leftovers covered in the refrigerator for up to 5 days. You can also freeze slices for up to 2 months!
- Serve with a Twist: Pair with a drizzle of chocolate or caramel sauce for an added indulgent touch.
- Garnish Creatively: Experiment with seasonal toppings like crushed candy canes, chocolate shavings, or even fresh berries!
Common Mistakes and Troubleshooting
Even the best bakers can run into challenges. Here are some common pitfalls and how to avoid them:
- Cracks in the Cheesecake: This can happen if the filling is overmixed or if it bakes too long. Use a water bath and avoid overmixing to keep your cheesecake smooth.
- Cheesecake Not Setting: Ensure you give it enough chilling time. If it’s still too soft after chilling, it may need more time in the refrigerator.
- Too Sweet or Not Sweet Enough: Adjust sugar levels to your taste. Always taste as you go!
- Crust Falling Apart: Ensure you’ve pressed the crust firmly into the pan and let it cool completely before adding the filling.
Variations to Try
Want to switch things up? Here are some fun variations to personalize your cheesecake:
- Chocolate Chip Red Velvet Cheesecake: Fold in chocolate chips into the cheesecake filling for an extra indulgent treat.
- Red Velvet Oreo Cheesecake: Use Oreo cookies in both the crust and as a layer in the filling for a double dose of chocolatey goodness.
- Mint Chocolate Chip Cheesecake: Add mint extract to the filling and top with crushed peppermint candies for a refreshing twist.
- Nutty Red Velvet Cheesecake: Incorporate crushed nuts like pecans or walnuts into the crust for added crunch and flavor.
Make Ahead and Storage Instructions
This cheesecake is perfect for making ahead of time, allowing you to enjoy more time with your loved ones during the holiday season. Here’s how:
- Make Ahead: You can prepare the cheesecake up to 2 days in advance. Just be sure to cover it well in the refrigerator.
- Freezing Instructions: Slice the cheesecake and wrap each piece in plastic wrap, followed by aluminum foil. Freeze for up to 2 months. Thaw overnight in the refrigerator before serving.
Serving Suggestions
Elevate your cheesecake experience with these serving ideas:
- Pair with Fresh Berries: Serve slices with fresh strawberries, raspberries, or blueberries for a burst of color and flavor.
- Drizzle with Chocolate Sauce: A warm drizzle of chocolate sauce adds an indulgent touch to each slice.
- Whipped Cream Galore: Top with extra whipped cream and a sprinkle of chocolate shavings for a delightful finish.
- Festive Drink Pairing: Serve with a hot cup of cocoa or spiced apple cider to complement the rich flavors.
Frequently Asked Questions (FAQs)
Let’s address some common questions about this delightful dessert:
- Can I use low-fat cream cheese? Yes, you can substitute with low-fat cream cheese, but the texture may be slightly different.
- How long does this cheesecake last? It will last for about 5 days in the refrigerator if stored properly.
- Can I make this cheesecake gluten-free? Absolutely! Use gluten-free Oreo cookies for the crust.
- What can I use instead of heavy whipping cream? You can use Cool Whip or a non-dairy whipped topping if preferred.
- Can I add fruit to the filling? Yes! You can fold in chopped strawberries or raspberries for a fruity twist.
- What’s the best way to slice the cheesecake? Use a sharp knife dipped in hot water for clean cuts.
- Can I substitute red food coloring? Yes, natural alternatives like beet juice can be used, though it may alter the flavor slightly.
- Is it necessary to use a springform pan? While a springform pan is recommended for easy removal, you can use a regular pie dish if you don’t have one.
Nutrition Tips and Dietary Adaptations
If you’re watching your diet or have specific dietary needs, here are some tips:
- Reduced Sugar: To cut down on sugar, use a sugar substitute or reduce the amount of sugar in the filling.
- Dairy-Free Options: Substitute cream cheese with vegan cream cheese and use coconut cream in place of heavy whipping cream for a dairy-free version.
- Lower Calorie Crust: Use almond flour or oat flour to create a lighter crust option.
Equipment Recommendations
Here’s what you’ll need to create the perfect cheesecake:
- Springform Pan: Essential for easy removal and presentation.
- Mixing Bowls: Use medium to large mixing bowls for combining ingredients comfortably.
- Electric Mixer: A hand mixer or stand mixer makes it easy to achieve a smooth filling.
- Measuring Cups and Spoons: Accurate measurements are crucial for baking success!
- Rubber Spatula: Perfect for scraping down the sides of bowls and folding ingredients together.
Conclusion
There you have it! An irresistibly easy Christmas Red Velvet Cheesecake recipe that’s bound to become a favorite in your holiday repertoire. Remember, cooking should be fun, and this cheesecake is a wonderful way to spread joy and sweetness during the festive season. So gather your ingredients, channel your inner baker, and let’s create something spectacular together. Happy baking!

Irresistibly Easy Christmas Red Velvet Cheesecake Recipe
Ingredients
Crust
- 24 cookies Oreo Cookies (Crushed)
- 1/2 cup Unsalted Butter (Melted)
Filling
- 16 oz Cream Cheese (Softened)
- 1 cup White Sugar (Adjust to taste)
- 1 cup Heavy Whipping Cream (Or Cool Whip)
- 1 tsp Vanilla Extract (Or peppermint extract)
- 1/4 cup Cocoa Powder (Adjust to taste)
- 1 tbsp Red Food Coloring (Adjust to desired shade)
Decorations
- 1/2 cup Christmas Sprinkles
- 1 cup Whipped Cream (Fresh or store-bought)
- 1/2 cup Mini Oreos (For decoration)
Instructions
- Combine crushed cookies and melted butter, press into a springform pan to form the crust.
- Cream together cream cheese, sugar, vanilla, and cocoa powder until smooth.
- Add whipped cream and red food coloring, mix until well combined.
- Pour filling over crust, smooth the top, and chill for at least 4 hours.
- Decorate with whipped cream, sprinkles, and mini Oreos before serving.