Unlock the Joy of Baking with Easy No-Knead Olive Bread
If you’ve ever thought that baking bread is a daunting task, you’re in for a delightful surprise! Today, we’re diving into the world of Easy No-Knead Olive Bread. This recipe is not just about the end product; it’s about the joy of creating something amazing right in your kitchen. Whether you’re a seasoned baker or a complete novice, this recipe is designed to make you feel confident and inspired. Let’s get those aprons on and embark on this delicious adventure together!
Why You’ll Love This Recipe
There are endless reasons to fall in love with this no-knead olive bread. Here are just a few:
- Minimal Effort: This recipe requires no kneading, making it perfect for busy schedules or beginner bakers.
- Flavorful Ingredients: Packed with olives, garlic, and oregano, every bite bursts with Mediterranean flavor.
- Perfect Texture: The bread bakes up with a crispy crust and a soft, airy interior that’s just to die for.
- Versatile Use: Enjoy it as a side with meals, as a base for sandwiches, or simply with a drizzle of olive oil.
- Impressive Presentation: The rustic look of this bread will wow your family and friends, making you the star of any gathering.
Ingredients Breakdown
Let’s look at what you’ll need to create this amazing olive bread, along with some handy substitutions:

★ Recommended Kitchen Tool
Meal Prep Container Set
Make this recipe even easier with a quality Meal Prep Container Set — a must-have kitchen staple!
- Bread Flour: 3 and 1/4 cups (about 430g), spooned and leveled. If you’re out of bread flour, you can use all-purpose flour, though the texture might be slightly different.
- Yeast: 2 teaspoons of either instant or active dry yeast will work wonderfully.
- Coarse Salt: 2 teaspoons. This enhances the flavor; don’t skip it! You can substitute with sea salt if that’s what you have.
- Dried Oregano: 2 teaspoons. For a different flavor profile, consider using Italian seasoning or fresh herbs.
- Garlic Powder: 1 and 1/2 teaspoons. If you prefer fresh garlic, use about 2-3 cloves, minced.
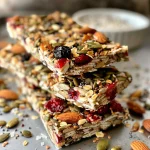
- Olives: 1 and 1/2 cups (about 135g) roughly chopped. Kalamata olives are fantastic, but feel free to experiment with green or mixed olives.
- Water: 1 and 1/2 cups (360ml) close to room temperature at about 70°F (21°C). If you’re unsure, just consider adding slightly warm water to help activate the yeast.
- Cornmeal (Optional): For dusting the pan to prevent sticking. You can also use flour if you prefer.
Let’s Get Baking: Step-by-Step Instructions
![['Close-up view of a crusty no-knead olive bread loaf with visible olives.', 'Side shot of freshly baked no-knead olive bread, showing a golden crust and olive chunks.', 'A slice of no-knead olive bread revealing its soft interior and scattered olives.', 'Juicy no-knead olive bread resting on a wooden surface, highlighting its texture.']](https://snacknova.com/wp-content/uploads/2026/06/no-knead-olive-bread_1_U2.webp)
Ready to bring your kitchen to life with the smell of fresh-baked bread? Follow these simple steps:
- Mix the Dry Ingredients: In a large un-greased mixing bowl, whisk together the flour, yeast, salt, oregano, and garlic powder.
- Add the Olives: Using a silicone spatula or wooden spoon, mix in the olives until evenly distributed.
- Incorporate the Water: Pour in the water and gently mix until all the flour is moistened. The dough will be shaggy and sticky.
- Let It Rise: Cover the dough tightly with plastic wrap or aluminum foil and let it rise at room temperature for 2-3 hours. It should double in size and be bubbly.
- Refrigerate (Optional): For enhanced flavor, refrigerate the dough for at least 12 hours (up to 3 days) before baking.
- Prepare for Baking: Lightly dust a large nonstick baking sheet with flour and/or cornmeal. Turn the dough out onto a floured surface and shape it into a ball.
- Second Rise: Place the shaped dough onto the prepared baking sheet, cover it loosely, and allow it to rest for 45 minutes.
- Preheat the Oven: While the dough rests, preheat your oven to 425°F (218°C).
- Score the Dough: Using a sharp knife or bread lame, score the dough with a shallow cut (about 1/2 inch deep).
- Steam for a Crispy Crust (Optional): For a crispier crust, place a shallow metal pan on the bottom rack and pour in boiling water just before placing the dough in the oven.
- Bake: Place the dough in the preheated oven and bake for 35-40 minutes or until golden brown and hollow-sounding when tapped.
- Cool and Serve: Let the bread cool for at least 10-20 minutes before slicing and serving. Enjoy!
Pro Tips for Perfect Olive Bread
Here are some expert insights to ensure your olive bread turns out amazing:
- Stickiness is Normal: Don’t worry if the dough feels sticky. This is what gives your bread its unique texture!
- Temperature Matters: Make sure your water is at the right temperature (around 70°F) to activate the yeast effectively.
- Don’t Rush the Rise: Allowing the dough to rise properly is essential for developing flavor.
- Experiment with Olives: Try different types of olives for varied flavors. Sun-dried tomatoes or roasted garlic can also be added for a twist.
- Store Properly: Keep leftover bread loosely covered or in a paper bag for the best texture.
- Check for Doneness: Use an instant-read thermometer; the internal temperature should reach 195°F (90°C).
- Sharpen Your Knife: A sharp knife or lame will make scoring the dough much easier and cleaner.
- Practice Patience: If the dough doesn’t rise as expected, give it extra time; rising can take longer in cooler environments.
Common Mistakes and Troubleshooting
Even the best bakers can encounter hiccups. Here are some common issues and how to fix them:
- Dough Won’t Rise: Ensure your yeast is fresh. If it’s expired, it may not activate.
- Dense Bread: This can happen if there wasn’t enough water or if the dough was overmixed. Be gentle!
- Crust Too Hard: If your crust is too hard, consider reducing the baking time or adding steam during baking.
- Bread Sticking to the Pan: Always dust your baking surface with flour or cornmeal to prevent sticking.
- Flavor Lacking: If your bread lacks flavor, consider adding more herbs or adjusting salt levels in the dough.
Delicious Variations to Try
If you want to mix things up, here are some fun variations:
- Herb-Infused: Add fresh herbs like thyme, rosemary, or basil for an aromatic twist.
- Cheesy Delight: Fold in shredded cheese like feta or mozzarella for a cheesy version of olive bread.
- Spicy Kick: Mix in some chopped jalapeños or red pepper flakes for a spicy variation.
- Nutty Addition: Incorporate chopped nuts like walnuts or pine nuts for added texture and flavor.
Storage and Make-Ahead Instructions
Want to enjoy this bread beyond just one day? Here’s how to store it:
- Room Temperature: Store at room temperature in a paper bag for up to 3 days.
- Refrigerator: If you need it to last longer, keep it in the fridge for up to 1 week.
- Freezing: Wrap tightly in foil or plastic wrap and freeze for up to 3 months. Thaw at room temperature before serving.
- Make-Ahead Option: The dough can be prepared in advance and refrigerated for up to 3 days. Just shape and bake when you’re ready!
Frequently Asked Questions
Here are some common questions about making olive bread:
- Can I use all-purpose flour instead of bread flour? Yes, but the texture may differ slightly.
- How do I know if my bread is done? It should be golden brown and sound hollow when tapped. An internal temp of 195°F (90°C) is ideal.
- Can I add other ingredients to the dough? Absolutely! Feel free to experiment with different herbs, spices, or even nuts.
- How do I store leftover olive bread? Keep it loosely covered at room temperature or in the fridge for up to a week.
- Can I make this bread gluten-free? Yes, you can use a gluten-free flour blend, but results may vary.
- What’s the best way to serve this olive bread? It pairs wonderfully with olive oil for dipping, alongside cheeses, or as part of a charcuterie board.
- Can I bake this bread in a Dutch oven? Yes, you can! Just preheat the Dutch oven and bake it covered for the first half of the baking time.
- Is it normal for the dough to be sticky? Yes, a sticky dough is typical for no-knead bread and contributes to its wonderful texture.
Nutritional Tips and Dietary Adaptations
This olive bread recipe can easily be adapted to fit various dietary needs:
- Vegan Option: This recipe is naturally vegan as it contains no animal products.
- Low-Sodium Version: Reduce the amount of salt in the recipe if you’re watching your sodium intake.
- Whole Grain Option: Substitute part of the bread flour with whole wheat flour for added fiber.
- Oil-Free Version: Use less olives or substitute with sun-dried tomatoes to reduce fat content.
Essential Equipment for Success
Here’s what you’ll need to make this olive bread recipe:
- Mixing Bowl: A large bowl for mixing your ingredients.
- Baking Sheet: A nonstick baking sheet or a pizza stone works great for baking.
- Sharp Knife or Bread Lame: For scoring the dough before baking.
- Plastic Wrap or Aluminum Foil: To cover the dough during rising.
- Instant-Read Thermometer: To check the bread’s doneness.
Serving Suggestions
Wondering how to serve this delicious bread? Here are some ideas:
- With Dips: Serve with a side of olive oil, balsamic vinegar, or hummus for dipping.
- As a Sandwich Base: Use slices of olive bread to create gourmet sandwiches.
- Accompanying Soup: Pair it with your favorite soups for a comforting meal.
- Cheese Board: Slice it up for an impressive cheese and charcuterie board.
Conclusion
And there you have it! You’ve just unlocked the secrets to baking your own Easy No-Knead Olive Bread. Remember, the kitchen is a place to explore, experiment, and enjoy. So, don’t be afraid to get a little playful with this recipe. Happy baking, and thank you for joining me on this delicious journey. Can’t wait to hear about your bread-making adventures!
![['Close-up view of a crusty no-knead olive bread loaf with visible olives.', 'Side shot of freshly baked no-knead olive bread, showing a golden crust and olive chunks.', 'A slice of no-knead olive bread revealing its soft interior and scattered olives.', 'Juicy no-knead olive bread resting on a wooden surface, highlighting its texture.']](https://snacknova.com/wp-content/uploads/2026/06/no-knead-olive-bread_1_U1.webp)
Easy No-Knead Olive Bread
Ingredients
Dough
- 3 1/4 cups bread flour (spooned & leveled, plus more for shaping and pan)
- 2 teaspoons instant or active dry yeast
- 2 teaspoons coarse salt (see note)
- 2 teaspoons dried oregano
- 1 1/2 teaspoons garlic powder
- 1 heaping cup roughly chopped olives
- 1 1/2 cups water (close to room temperature at about 70°F (21°C))
- optional cornmeal (for dusting pan)
Instructions
- Mix flour, yeast, salt, oregano, and garlic powder in a bowl. Stir in olives, then add water and mix until shaggy. Shape into a ball, cover, and let rise for 2-3 hours or refrigerate for 12 hours to 3 days.
- Turn dough onto a floured surface, shape into a ball, and let rest for 45 minutes. Preheat oven to 425°F (218°C) during this time.
- Score the dough with a slash or X. If desired, place a pan of boiling water in the oven for steam. Transfer dough to a prepared baking sheet.
- Bake for 35-40 minutes until golden brown and hollow-sounding or internal temperature reaches 195°F (90°C). Cool before slicing.