
Are you ready to elevate your snacking game? Look no further! In this article, we’re diving into the delightful world of No-Bake Workout Bars. These bars are not only easy to prepare but also packed with energy-boosting ingredients, making them a perfect choice for a quick snack or a post-workout treat. If you’ve ever struggled with what to eat after a workout or simply want a healthy snack on hand, this recipe is for you!
Imagine biting into a chewy, delicious bar that’s filled with all the good stuff your body craves. With a delightful mix of oats, peanut butter, and chocolate chips, you’ll feel like you’re indulging in a treat while actually fueling your body. Let’s get into the details of this irresistible recipe!
Why You’ll Love This Recipe
This recipe is designed to be a hit, and here are a few reasons why:
- Quick and Easy: You only need a handful of ingredients and minimal prep time to whip these up. Perfect for busy days!
- Customizable: Feel free to swap out ingredients based on your preferences or what you have on hand. Love almonds? Toss them in!
- Healthy Ingredients: Packed with rolled oats, chia seeds, and peanut butter, you’re getting a wholesome energy boost without any artificial nasties.
- Great for Meal Prep: Make a batch on the weekend, and you’ll have a healthy snack ready to go all week long.
- Kid-Friendly: These bars are a hit with kids! Get them involved in the kitchen and let them help create their own snack bars.
Ingredient Breakdown and Substitutions
Let’s take a closer look at the key players in this recipe and how you can alter them to fit your needs.
- Rolled Oats: The base of our bars. They provide fiber and help bind the mixture. If you’re gluten-sensitive, you can use certified gluten-free oats.
- Clean Protein Powder: This is optional but adds a protein punch. You can use whey, plant-based, or even leave it out entirely!
- Mini Chocolate Chips: For a touch of sweetness and a fun texture. Dark chocolate or carob chips work well too!
- Chia Seeds or Ground Flax Seeds: Both are excellent sources of omega-3 fatty acids. If you don’t have either, consider sunflower seeds.
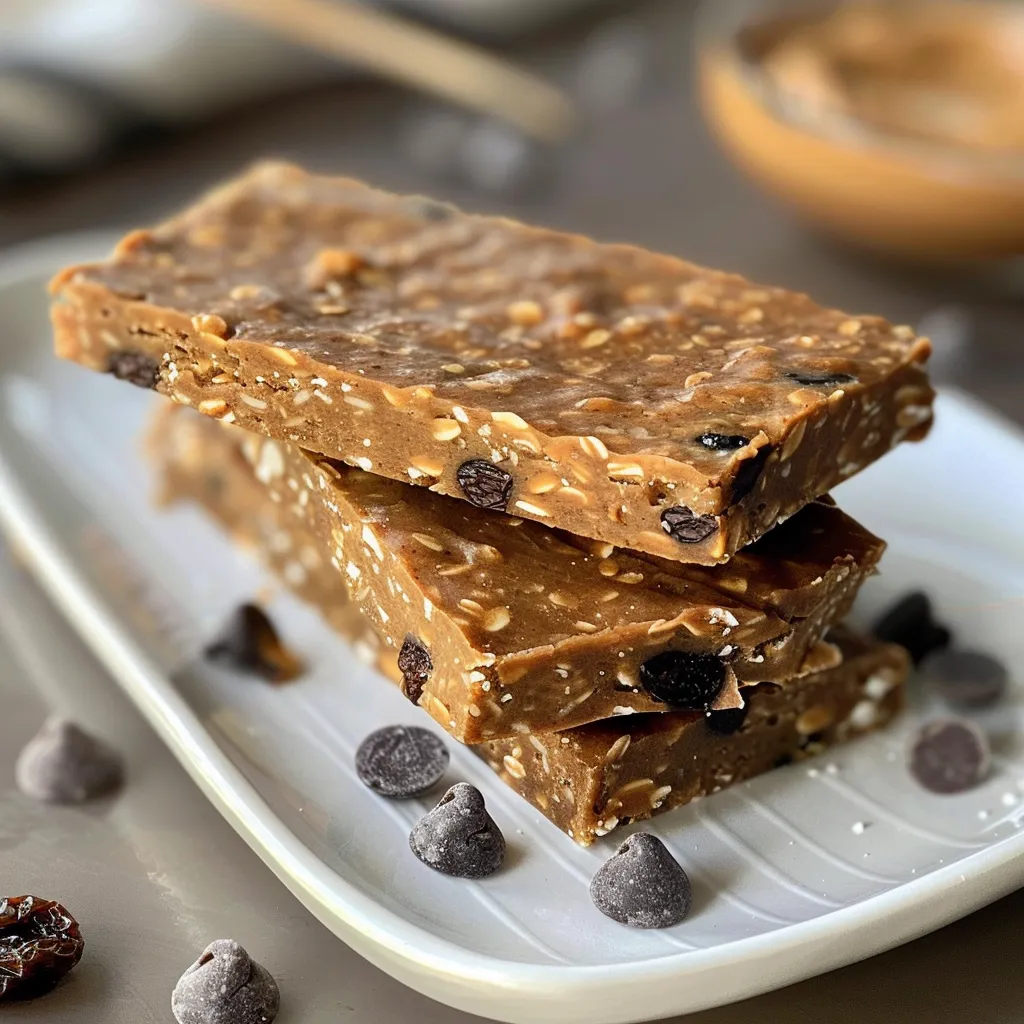
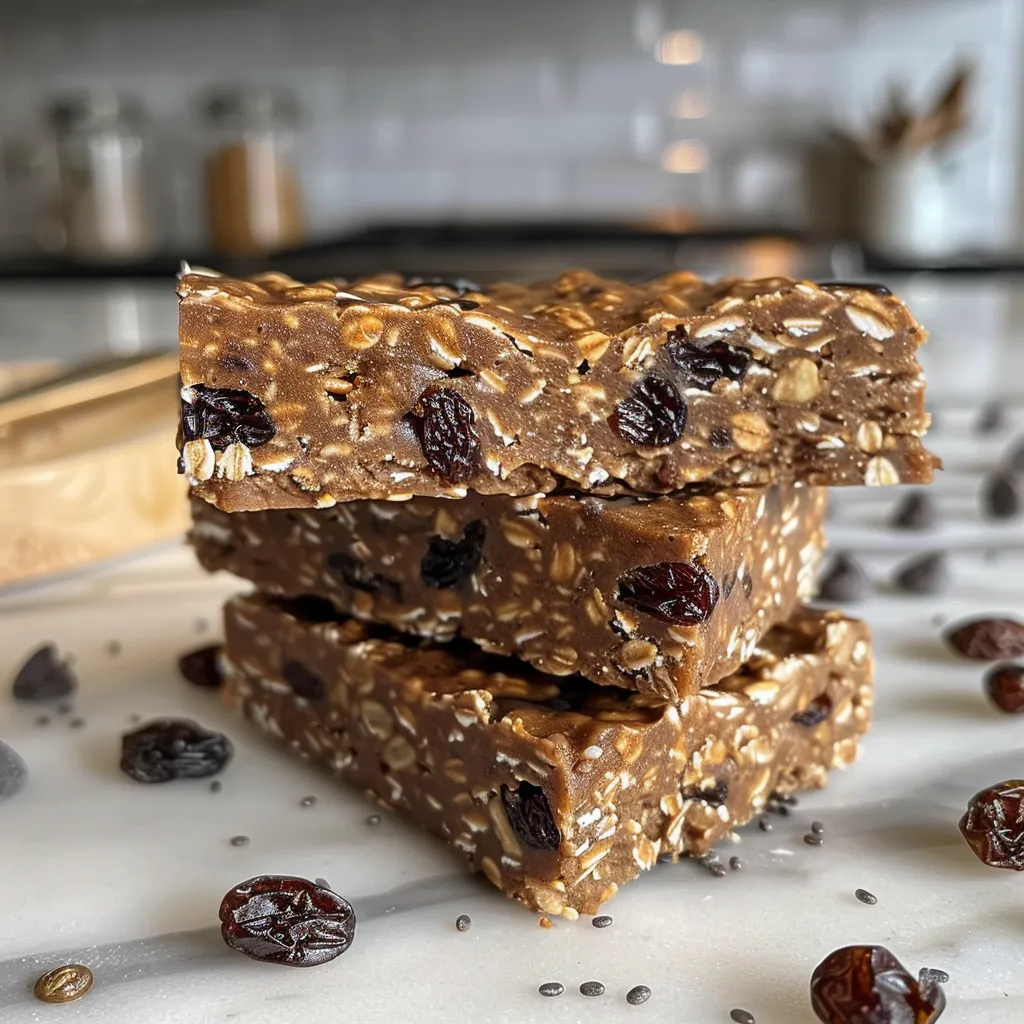
- Raisins: They add natural sweetness and chewiness. Feel free to substitute with dried cranberries or chopped dates if you prefer.
- Peanut Butter: The star ingredient! Use natural peanut butter for a healthier option or swap it for almond or sunflower seed butter for nut allergies.
- Coconut Milk: This adds creaminess. Adjust the amount based on the desired consistency—more for a softer bar and less for a firmer one.
- Honey: A natural sweetener that helps bind the bars. Maple syrup is a great vegan alternative!
How to Make No-Bake Workout Bars
Now that we have our ingredients ready, let’s get started on these delicious bars!
Step 1: Make the Oat Flour
In a blender, pulse 1 ½ cups of the rolled oats until you achieve a flour-like consistency. This is a key step that helps your bars hold together beautifully.
Step 2: Combine the Dry Ingredients
In a large bowl, mix together the oat flour, remaining ½ cup of rolled oats, protein powder, mini chocolate chips, chia or flax seeds, and raisins. This creates a yummy base.
Step 3: Mix the Wet Ingredients
In a medium bowl, stir together the coconut milk, peanut butter, and honey until smooth. This creamy mixture will bind everything together.
Step 4: Combine and Press
Pour the peanut butter mixture over the oat mixture. Stir until everything is thoroughly incorporated. Then, spread the mixture into a 9 x 9-inch square pan or an 11 x 7-inch pan. Press it down firmly to ensure it holds its shape.
Step 5: Chill
Cover the pan with a lid or foil and refrigerate overnight, or until the bars are firm. Once set, slice into 12 bars and keep stored in the refrigerator.
Pro Tips for Success
Here are some of my expert tips to make your no-bake workout bars even better:
- Consistency is Key: Adjust the coconut milk gradually to get the right texture. You want a thick, moldable mixture.
- Press Firmly: When spreading the mixture in the pan, press down firmly to compact it. This will make for sturdier bars.
- Let Them Chill: Don’t skip the chilling step! It’s crucial for the bars to firm up properly.
- Experiment with Flavors: Add a dash of cinnamon, vanilla extract, or even a pinch of salt for extra flavor!
- Make Them Your Own: Swap out the chocolate chips for nuts, seeds, or dried fruit to customize your bars.
- Keep It Clean: Use parchment paper to line your pan for easier removal and cleanup.
- Check Consistency: If your mixture seems too dry, add a little more coconut milk. If too wet, add more oats or protein powder.
- Store Properly: Keep your bars in an airtight container in the fridge for maximum freshness.
Common Mistakes and Troubleshooting
Even the best of us can stumble in the kitchen! Here are some common pitfalls and how to avoid them:
- Bars Too Crumbly: This could be due to a lack of moisture. Make sure you’re adding enough coconut milk and peanut butter.
- Bars Too Soft: If they don’t hold up after chilling, consider adding more oats or protein powder next time.
- Uneven Texture: Ensure you mix the wet and dry ingredients thoroughly for a consistent bar.
- Too Sweet: If you find the bars are too sweet, reduce the amount of honey or chocolate chips in your next batch.
Variations to Try
Feeling adventurous? Here are some fun variations you can try:
- Chocolate Peanut Butter: Use chocolate protein powder and chocolate chips for an extra chocolaty treat!
- Nutty Delight: Add chopped nuts like almonds, walnuts, or pecans for a crunchy twist.
- Fruity Fusion: Mix in chopped dried fruits like apricots or figs for a burst of sweetness.
- Spicy Cinnamon: Add a teaspoon of ground cinnamon and a handful of raisins for a warm, cozy flavor.
Storage and Make-Ahead Instructions
These bars are perfect for meal prep! Here’s how to store them:
- Refrigeration: Store your bars in an airtight container in the fridge for up to a week. They’ll stay fresh and delicious!
- Freezing: For longer storage, you can freeze the bars. Wrap each bar individually in plastic wrap and place them in a freezer-safe bag. They’ll last up to three months!
- Thawing: To enjoy, simply take a bar out of the freezer and let it thaw in the fridge overnight.
Frequently Asked Questions
Got questions? I’ve got answers! Here are some FAQs about these no-bake workout bars:
- Can I use a different nut butter? Absolutely! Feel free to use almond butter, sunflower seed butter, or any nut butter of your choice.
- How do I know if the bars are set? After chilling, the bars should feel firm to the touch and hold their shape when cut.
- Can I make these bars vegan? Yes! Use plant-based protein powder and substitute honey with maple syrup.
- What if I don’t have protein powder? You can omit it, but consider adding extra oats or nuts to maintain the consistency.
- How do I store leftovers? Keep any leftover bars in an airtight container in the fridge or freeze them for later.
- Are these bars suitable for kids? Yes! They’re a great healthy snack option for kids, and you can customize them to their tastes.
- Can I add other flavors? Definitely! Experiment with spices or extracts, like vanilla or almond flavoring, to create your own unique bars.
- How long do they take to make? You’ll spend about 15 minutes prepping and then just let them chill overnight!
Nutritional Tips and Dietary Adaptations
These bars are not just tasty; they are also packed with nutrition! Here are some tips to enhance their health benefits:
- Protein Boost: For a higher protein content, consider adding Greek yogurt on the side or increasing the amount of protein powder.
- Fiber Power: Chia seeds and flax seeds are excellent for boosting fiber. You can also include psyllium husk for even more fiber.
- Healthy Fats: Using natural nut butters adds healthy fats, which are essential for energy and satiety.
- Low Sugar Option: If you want to reduce sugar, use less honey or choose a sugar-free sweetener alternative.
Equipment Recommendations
To make your kitchen experience smoother, here are some handy tools:
- Blender or Food Processor: To easily make oat flour and blend wet ingredients.
- Mixing Bowls: A large bowl for mixing dry ingredients and a medium bowl for the wet ingredients.
- 9 x 9-Inch Pan: Ideal for setting your bars. You can also use parchment paper for easy removal.
- Spatula: For smooth mixing and spreading the mixture evenly in the pan.
Serving Suggestions
These bars are versatile and can be served in various ways:
- On-the-Go Snack: Perfect for grabbing on your way out the door or after a workout!
- With a Side of Fruit: Pair with a banana or apple for a well-rounded snack.
- As a Breakfast Option: Enjoy with a cup of yogurt and fresh berries for a satisfying breakfast.
- In Lunchboxes: Great for kids’ lunches or your own work snack.
With all these tips, variations, and essential information, you’re now ready to take on the kitchen and create your own batch of No-Bake Workout Bars. Remember, cooking is all about having fun and experimenting. So, get in there, make some delicious bars, and enjoy every bite! Thank you for joining me on this culinary adventure. Happy cooking!
No-Bake Workout Bars
Ingredients
Oats
- 2 cups rolled oats
- 0.5 cup clean protein powder
- 0.5 cup mini chocolate chips
- 0.5 cup chia seeds or ground flax seeds
- 0.5 cup raisins
- 1 cup peanut butter natural
- 0.25 cup lite coconut milk (more or less as needed)
- 0.25 cup honey raw
Instructions
- Pulse 1.5 cups of oats in a blender until flour-like.
- In a large bowl, combine oat flour, remaining oats, protein powder, chocolate chips, seeds, and raisins.
- Mix coconut milk, peanut butter, and honey in a medium bowl.
- Pour wet mixture over dry ingredients and stir until well combined.
- Press mixture into a 9x9-inch pan, cover, and refrigerate overnight.
- Slice into 12 bars and store in the refrigerator.
![['Close-up view of freshly baked oatmeal bread with a golden crust.', 'Side view of a sliced oatmeal bread revealing its soft texture and oats.', 'Detailed image of a loaf of oatmeal bread showcasing its rich color and ingredients.', 'A rustic slice of oatmeal bread on a wooden board, highlighting its moist interior.']](https://snacknova.com/wp-content/uploads/2026/06/oatmeal-bread_1_U1-150x150.webp)