Welcome to the World of Homemade Herb Buns!
Hey there, fellow food lovers! Are you ready to dive into the delightful world of baking with our easy Herb Buns Recipe? These buns are not just your ordinary rolls; they are packed with flavorful herbs and spices that will elevate any meal. Whether you’re hosting a family dinner or just want to enjoy a cozy night in, this recipe will bring warmth and joy to your table. Let’s whisk up some magic in the kitchen together!
Why You’ll Love This Recipe
- Delicious Flavor: The combination of herbs like parsley and oregano creates a savory aroma that fills your kitchen and tantalizes your taste buds.
- Easy to Make: With simple steps and accessible ingredients, even beginner bakers can whip these buns up with confidence.
- Perfect Texture: These rolls are soft on the inside with a slightly crusty exterior, making them the ideal side for soups, salads, and any main dish.
- Versatile Pairing: Whether you serve them with butter, olive oil, or as a sandwich base, these herb buns will complement a variety of meals.
- Make-Ahead Friendly: Prep these buns in advance and freeze them for a quick, homemade touch to any dinner.
Ingredient Breakdown
Let’s take a closer look at the ingredients that make these herb buns so special:
- All Purpose Flour (Maida) – 2 cups: The base for our buns. You can substitute whole wheat flour for a healthier option, but the texture will be denser.
- Dry Yeast – 1.5 tsp: This is what will make your buns rise! Ensure your yeast is fresh for the best results.
- Sugar – 1 tblsp: Just a touch to help activate the yeast and add a hint of sweetness.
- Salt to taste: Essential for flavor; don’t skip it!
- Dried Parsley – 1 tblsp: Adds a fresh, vibrant flavor.
- Dried Oregano – 2 tsp: A must-have herb that gives these buns an Italian twist.
- Red Chilli Flakes – 2 tsp: For a subtle kick! Adjust to your spice preference.
- Olive Oil – 2 tblsp: This will enrich the dough, making the rolls softer.
- Warm Water as needed: To activate the yeast and bind the ingredients together.
- Milk – 2 tblsp (optional for brushing): Gives the buns a beautiful golden finish when baked.
Step-by-Step Instructions
Now that we have our ingredients ready, let’s roll up our sleeves and get to the fun part—baking!
- In a bowl, combine the yeast and sugar with warm water. Let it sit for about 5 minutes until it becomes frothy.
- In a separate large bowl, mix the flour, salt, dried herbs, and olive oil until well combined.
- Add the yeast mixture and enough water to form a soft dough. Knead for about 5-10 minutes until the dough is smooth and elastic.
- Drizzle a little olive oil on top of the dough, cover it with a damp cloth, and let it rise in a warm place for 1 to 2 hours, or until doubled in size.
- Once risen, punch down the dough and divide it into equal portions. Shape each piece into a smooth ball and flatten slightly.
- Place the shaped buns on a greased baking tray, cover them again, and let them rise for another 30 minutes to 1 hour.
- During the last 10 minutes of rising, preheat your oven to 200°C (400°F).
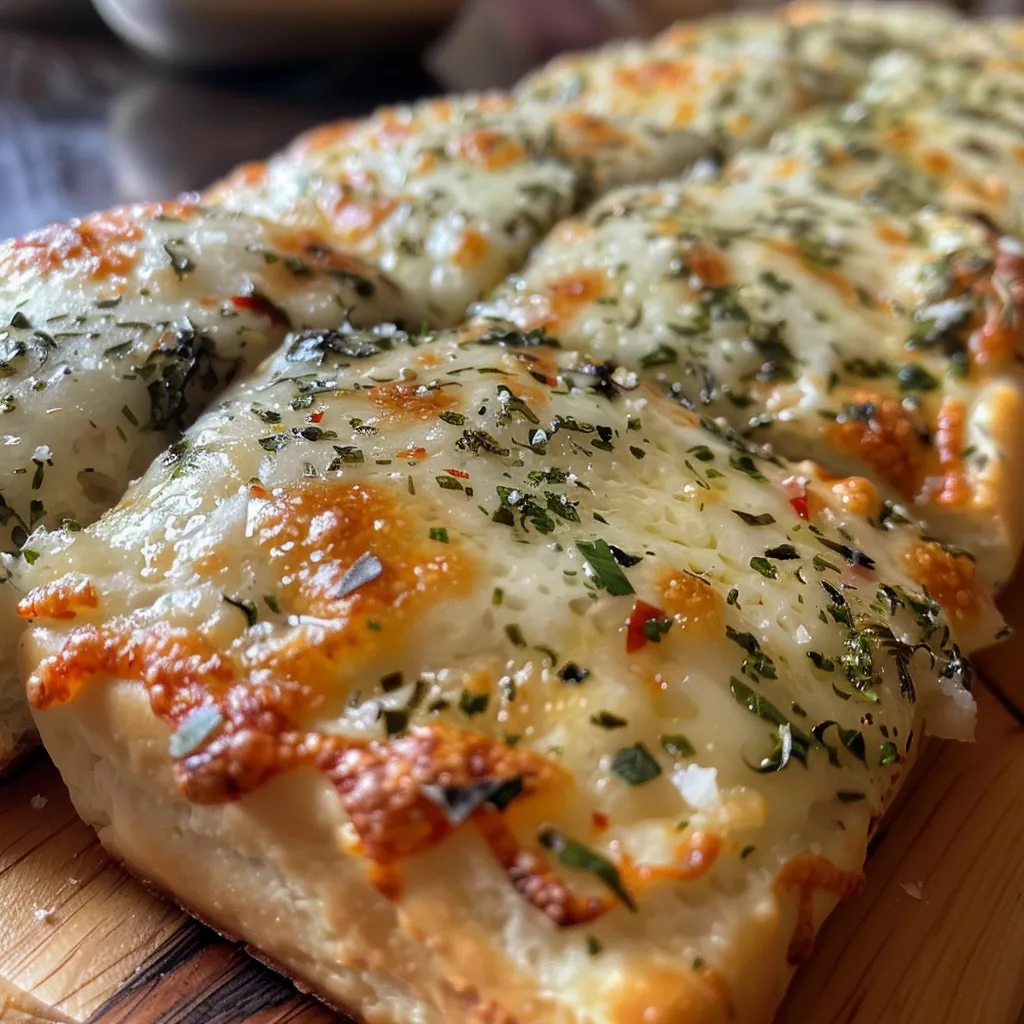
- Brush the tops with a little milk or egg wash for that golden finish.
- Bake for about 15 minutes or until golden brown. Let them cool slightly before serving.
Pro Tips for Perfect Herb Buns
- Temperature Matters: Ensure your warm water is between 110°F to 115°F to properly activate the yeast without killing it.
- Knead Well: Kneading develops gluten, making your buns fluffy and light. Don’t skip this step!
- Rising Time: Be patient! The longer the dough rises, the better the flavor and texture.
- Experiment with Herbs: Feel free to mix in other herbs like rosemary or thyme for different flavor profiles.
- Check Doneness: Tap the bottom of a bun; if it sounds hollow, it’s done!
- Storage Tip: Store any leftover buns in an airtight container at room temperature for up to 3 days.
- Freezing: You can freeze the dough before the second rise. Just thaw and let it rise before baking!
- Bake in Batches: If making a large batch, bake in two rounds for even cooking.
Common Mistakes and Troubleshooting
Even the best of us can face some hiccups in the kitchen. Here’s how to troubleshoot:
- Dough Not Rising: Ensure your yeast is active. If it’s old or your water was too hot, it might not work.
- Tough Buns: Over-kneading can make them dense. Knead just enough to develop the dough.
- Too Dry: If your dough feels dry, add a little more warm water, a tablespoon at a time.
- Too Moist: If the dough is sticky, gradually add a bit more flour while kneading.
Variations to Try
Looking to shake things up? Here are some fun variations:
- Cheesy Herb Buns: Add shredded cheese like mozzarella or cheddar into the dough for a cheesy delight.
- Garlic Herb Rolls: Mix minced garlic into the dough for a robust flavor.
- Spinach & Feta Buns: Incorporate chopped spinach and feta for a Mediterranean twist.
- Sweet Herb Buns: Swap sugar for honey and add cinnamon for a sweet, fragrant version.
Storage and Make-Ahead Instructions
These herb buns can be a lifesaver if you’re planning ahead:
- Room Temperature: Store in an airtight container for up to 3 days.
- Freezing: Freeze baked buns in a sealed bag. Reheat in the oven for a fresh-baked feel.
- Dough Storage: Freeze the dough after the first rise. Thaw in the refrigerator overnight before shaping.
FAQs About Herb Buns
- Can I use fresh herbs instead of dried? Yes! Use three times the amount of fresh herbs for the same flavor.
- What if I don’t have yeast? You can use baking powder, but the texture will be different.
- How do I know when the buns are done? They should be golden brown and sound hollow when tapped.
- Can I make these gluten-free? Yes, use a gluten-free flour blend, but the texture may vary.
- How can I spice them up? Add extra red chili flakes or even some jalapeños for a spicy kick!
- What are some serving suggestions? Serve warm with butter, as sliders, or alongside soups and salads.
- Can I double the recipe? Absolutely! Just make sure to use a large enough bowl for rising.
- What should I do if the dough is too sticky? Add a little flour gradually until it reaches the right consistency.
Nutrition Tips and Dietary Adaptations
We all want to enjoy delicious food while keeping health in mind. Here are some tips:
- Whole Grain Flour: Substitute half of the all-purpose flour with whole wheat for added fiber.
- Lower Sodium: Reduce salt to make these buns heart-healthier.
- Dairy-Free: Replace milk with almond or coconut milk for a dairy-free option.
- Vegan Option: Use aquafaba instead of eggs for brushing the tops.
Equipment Recommendations
Here’s what you’ll need to make these herb buns easily:
- Mixing Bowls: A large bowl for mixing and a smaller one for the yeast.
- Baking Sheet: A good quality baking sheet ensures even baking.
- Stand Mixer (optional): For those who prefer less manual kneading!
- Kitchen Towel: To cover the dough while it rises.
Serving Suggestions
These herb buns are incredibly versatile and can be enjoyed in many ways:
- As a Side: Perfect alongside soups, stews, or salads.
- For Sandwiches: Use them as a base for your favorite sandwiches or sliders.
- With Dips: Serve with olive oil and balsamic vinegar for dipping.
- Brunch Delight: Pair with eggs and bacon for a delightful brunch spread.
Wrap Up Your Baking Journey
There you have it—your complete guide to making the most delightful herb buns! I hope you feel inspired to get into the kitchen and whip up a batch. Remember, cooking is all about joy and creativity, so don’t hesitate to add your own twist! Happy baking, and enjoy every bite of your homemade herb buns!

Herb Buns Recipe
Ingredients
Dough
- 2 cups All Purpose Flour Maida
- 1.5 tsp Dry Yeast
- 1 tbsp Sugar
- to taste Salt
- 1 tbsp Dried Parsley
- 2 tsp Dried Oregano
- 2 tsp Red Chilli Flakes
- 2 tbsp Olive Oil
- as needed Warm Water
- 2 tbsp Milk (for brushing)
Instructions
- Activate yeast by mixing with sugar and warm water; let sit for 5 mins.
- Mix flour, salt, herbs, and olive oil; add yeast mixture and knead into a soft dough.
- Let the dough rise for 1-2 hours, then punch down and divide into balls.
- Shape into balls, flatten slightly, and let rise for 30 mins to 1 hour; preheat oven to 200°C during last 10 mins.
- Brush tops with milk, bake for 15 mins, then cool slightly before serving.