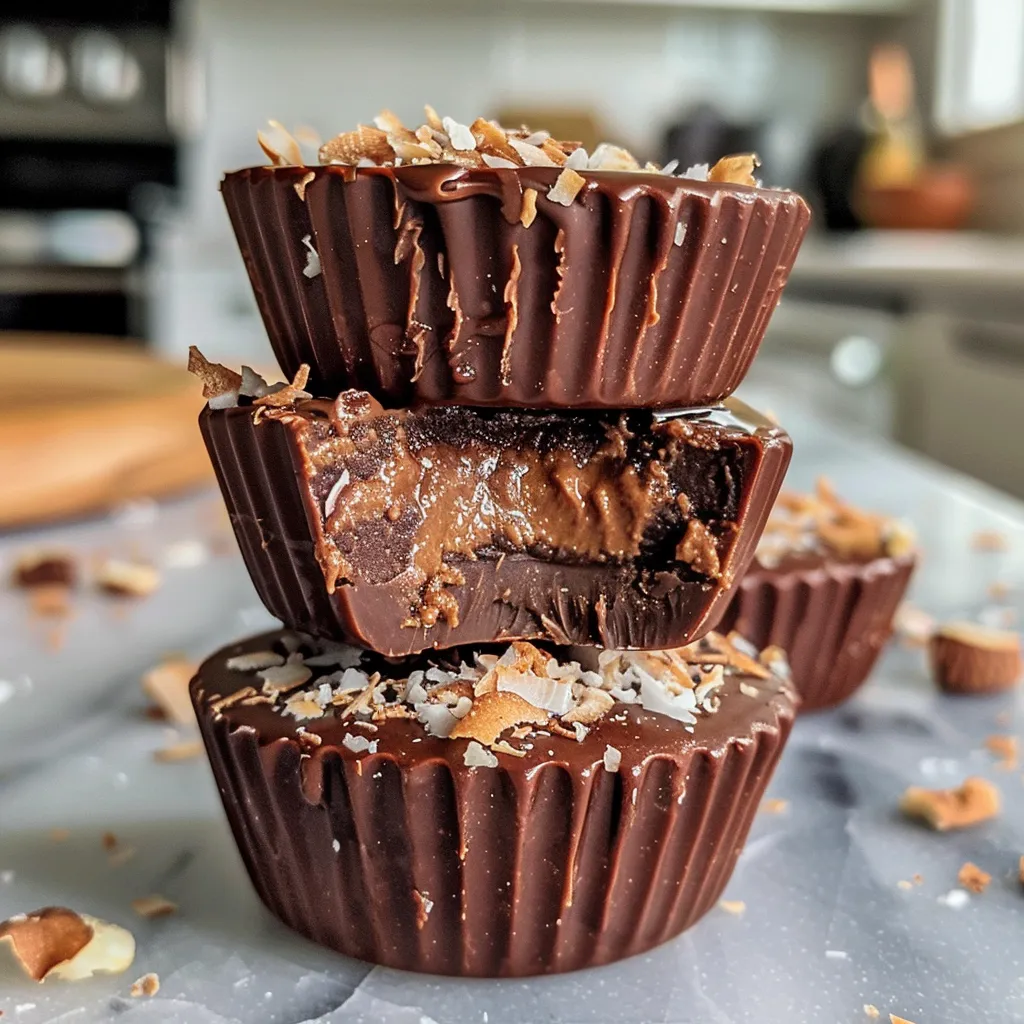
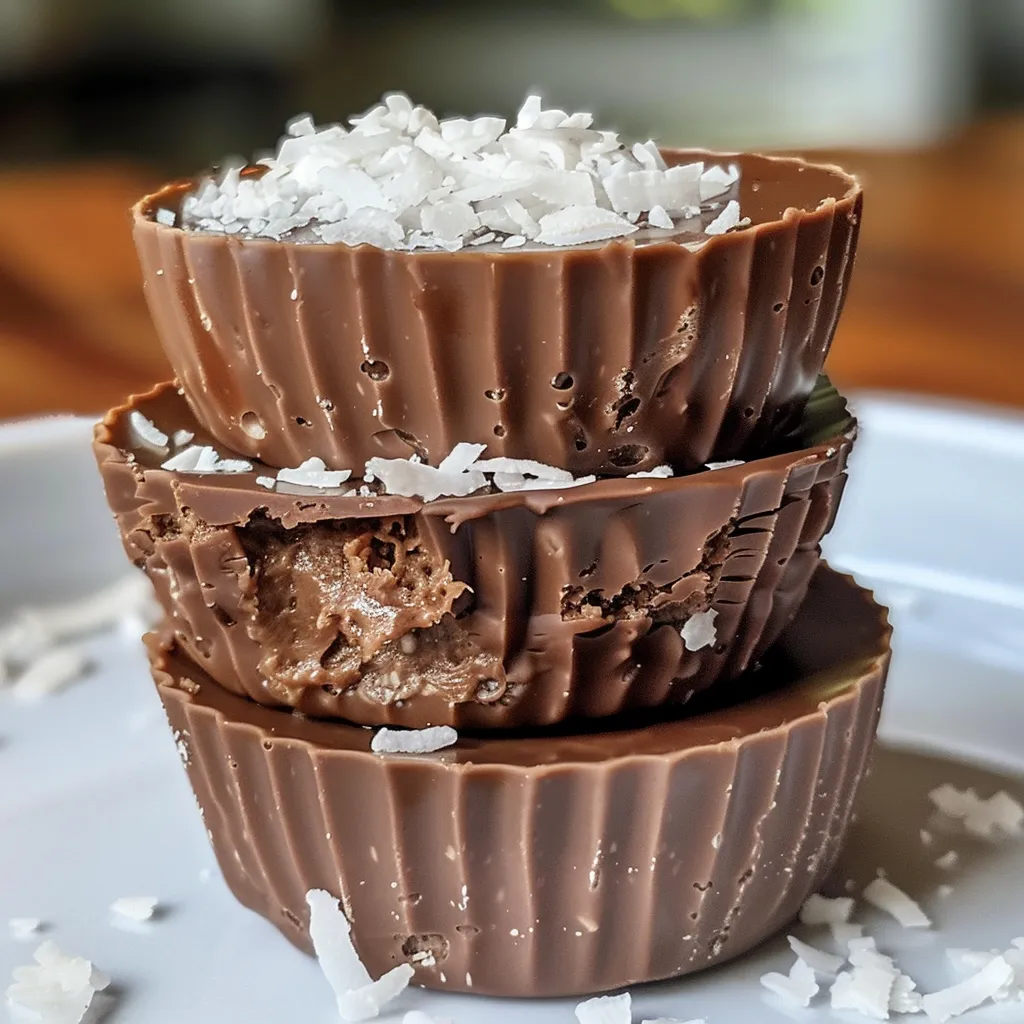
Unleashing the Joy of No-Bake Chocolate Coconut Protein Cups
Welcome to your new favorite treat! If you’re on the hunt for a deliciously satisfying snack that’s packed with protein and requires zero baking, you’ve landed in the right spot. These No-Bake Chocolate Coconut Protein Cups are not only a breeze to whip up but also a delightful way to fuel your day. With wholesome ingredients and rich flavors, they make for perfect post-workout snacks or a sweet pick-me-up anytime you need a boost. Let’s dive into the world of these delightful cups and discover how easy they are to make!
Why You’ll Love This Recipe
- Quick & Easy: These protein cups come together in just a few minutes and require no baking at all!
- Nutritious & Wholesome: Packed with protein powder, coconut, and healthy fats, they’ll keep you satisfied and energized.
- Customizable: With so many ingredient options, you can tweak the recipe to fit your dietary preferences and cravings.
- Perfect for Meal Prep: Make a batch ahead of time to have delicious snacks ready to grab and go all week.
- Kid-Friendly: A great way to get kids excited about healthy snacks while enjoying a treat that tastes like dessert.
Essential Ingredients for Your Protein Cups
Let’s break down the ingredients that make these protein cups not just delicious, but also nutritious:
- 1 cup unsweetened shredded coconut: Adds a chewy texture and tropical flavor.
- 1 1/2 cup vanilla or unflavored protein powder: Provides a protein boost—choose plant-based or whey based on your preference.
- 1/4 cup cocoa powder: Rich chocolate goodness without added sugars.
- 1/4 cup creamy peanut butter or almond butter: Gives a creamy consistency and healthy fats; feel free to swap with sunflower seed butter for a nut-free option.
- 3 tablespoons coconut oil, melted: Helps bind the mixture and adds a subtle coconut flavor.
- 3 tablespoons maple syrup or honey: A touch of natural sweetness—great for energy!
- 1 teaspoon vanilla extract: For that warm, inviting flavor.
- Pinch of salt: Enhances all the flavors.
- 2 tablespoons extra shredded coconut for topping (optional): Adds a fun finishing touch!
Step-by-Step Instructions
Ready to create your protein cups? Follow these easy steps:
- Line a standard 12-cup muffin tin with paper liners.
- In a medium bowl, combine the shredded coconut, protein powder, cocoa powder, and a pinch of salt. Mix well until fully combined.
- Add the peanut butter, melted coconut oil, maple syrup, and vanilla extract to the dry ingredients.
- Stir everything together using a sturdy spoon or spatula until a thick, uniform dough forms. If the mixture seems too dry, add 1 teaspoon of water or milk at a time until it holds together well.
- Divide the mixture evenly among the 12 muffin liners, pressing the mixture down firmly into each cup.
- If using, sprinkle the remaining shredded coconut on top of each cup.
- Place the muffin tin in the freezer for at least 1 hour to set completely.
- Store the finished protein cups in an airtight container in the refrigerator or freezer.
Pro Tips for Perfect No-Bake Protein Cups
- Use Room Temperature Ingredients: This helps combine everything more easily.
- Don’t Skip the Freezer: Freezing is essential for setting the cups; be patient!
- Adjust Sweetness: Taste the mixture before setting; feel free to add more maple syrup if you prefer it sweeter.
- Mix and Match Flavors: Experiment with different nut butters or add-ins like chopped nuts or seeds for extra crunch!
- Store Smart: Keep them in the fridge for a chewy texture or the freezer for a firmer bite.
- Watch for Overmixing: Mix until just combined—overmixing can make them dense.
- Try Different Toppings: Drizzle with melted dark chocolate or sprinkle with chia seeds for added nutrition.
- Double the Batch: These cups disappear fast, so consider making a double batch!
Common Mistakes and Troubleshooting
Even the best recipes can have hiccups! Here are some common mistakes to avoid and troubleshooting tips:
- Too Dry: If your mixture feels crumbly, add a little more coconut oil or your choice of milk until it holds together.
- Too Sticky: If it’s too sticky, try chilling the dough for a bit before pressing into the muffin liners.
- Not Setting: Ensure you freeze the cups long enough; they should be firm to the touch before you take them out.
Delicious Variations to Try
Want to shake things up? Here are some fun variations to personalize your protein cups:
- Chocolate Almond Joy: Add chopped almonds and a dash of almond extract for a classic flavor.
- Peanut Butter Banana: Mix in mashed banana for a sweet twist.
- Mint Chocolate Chip: Add a few drops of peppermint extract and some mini chocolate chips.
- Berry Blast: Stir in dried berries or chocolate-covered cranberries for a fruity flavor.
Storage and Make-Ahead Instructions
These protein cups are perfect for meal prep! Here’s how to store them:
- Refrigerator: Store in an airtight container for up to 1 week.
- Freezer: Freeze them for up to 3 months—just remember to separate layers with parchment paper.
Frequently Asked Questions
Got questions? We’ve got answers! Here are some FAQs about these delightful no-bake protein cups:
- Can I use a different kind of protein powder? Yes, feel free to substitute with any flavor you prefer!
- How do I make them vegan? Use plant-based protein powder, almond butter, and maple syrup.
- Can I skip the coconut oil? You can, but it helps bind the mixture and adds healthy fats.
- What if I don’t have shredded coconut? You can use finely ground oats or almond flour as a substitute.
- Can I make them nut-free? Absolutely! Switch to sunflower seed butter and ensure your protein powder is nut-free.
- How long do they take to set? At least 1 hour in the freezer is ideal for firmness.
- Can I add protein powder to other recipes? Yes! You can mix it into smoothies, baked goods, or oatmeal.
- What’s the best way to serve them? You can enjoy them straight from the fridge or freezer, or drizzle with warm chocolate sauce for an indulgent treat!
Nutritional Benefits and Dietary Adaptations
These protein cups not only taste great but are also packed with health benefits:
- High in Protein: Each cup delivers a substantial protein boost, perfect for active lifestyles.
- Good Fats: The healthy fats from coconut and nut butter support energy levels and satiety.
- Low Sugar: With natural sweeteners, they keep sugar levels in check while satisfying cravings.
Equipment Recommendations
To make your no-bake protein cups, you’ll need:
- Muffin Tin: A standard 12-cup muffin tin works perfectly for shaping your cups.
- Mixing Bowls: Use medium-sized bowls for combining your ingredients.
- Measuring Cups and Spoons: Precision is key for the best results!
- Spatula or Sturdy Spoon: For mixing and pressing the ingredients into the muffin liners.
Serving Suggestions
These protein cups are versatile! Here’s how you can enjoy them:
- As a Snack: Perfect for an afternoon pick-me-up or post-gym recovery.
- With Coffee: Pair one with your morning coffee for a delightful treat.
- With Fruit: Serve alongside fresh fruit for a balanced snack.
Now that you’re all set to make these delicious No-Bake Chocolate Coconut Protein Cups, gather your ingredients and get ready to impress yourself and others with your culinary skills. Enjoy the kitchen adventure, and remember, every scoop of joy counts! Happy cooking!
No-Bake Chocolate Coconut Protein Cups
Ingredients
Dry Ingredients
- 1 cup unsweetened shredded coconut
- 0.5 cup vanilla or unflavored protein powder (plant-based or whey)
- 0.25 cup cocoa powder
- 0.25 cup pinch of salt
Wet Ingredients
- 0.25 cup creamy peanut butter or almond butter
- 3 tablespoons coconut oil, melted
- 3 tablespoons maple syrup or honey
- 1 teaspoon vanilla extract
- 2 tablespoons extra shredded coconut for topping (optional)
Instructions
- Line a 12-cup muffin tin with paper liners.
- Mix shredded coconut, protein powder, cocoa powder, and salt in a bowl.
- Add peanut butter, melted coconut oil, maple syrup, and vanilla; stir until a thick dough forms. Add water or milk if too dry.
- Divide mixture into liners, pressing down firmly. Top with shredded coconut if desired.
- Freeze for at least 1 hour until set. Store in an airtight container in the fridge or freezer.