Unleash Your Inner Baker: A Guide to Raspberry Jam Bars
Welcome to a delightful journey of baking that will fill your kitchen with the sweet aroma of raspberry jam bars! These scrumptious treats are not only easy to make but also a fantastic way to brighten your day. With just a handful of simple ingredients, you can whip up a batch of these mouthwatering bars that are perfect for snacks, desserts, or even sharing with friends. Join me, Ava, in exploring the joy of baking these delightful raspberry jam bars and let’s create something delicious together!
Why You’ll Love This Recipe
Here are some reasons why this raspberry jam bars recipe will become a favorite in your kitchen:
- Easy to Make: With a straightforward method, you can bake these bars in under an hour, making them perfect for a quick dessert.
- Minimal Ingredients: Using just five simple ingredients, you can create a delicious treat without a trip to the grocery store.
- Versatile Flavors: While raspberry jam is the star, feel free to experiment with different fruit jams to suit your taste.
- Perfect for Any Occasion: Whether it’s a casual snack, a family gathering, or a potluck, these bars are always a hit!
- Kid-Friendly Cooking: Involve your little ones in the baking process—it’s a fun and rewarding way to spend time together!
Ingredient Breakdown and Substitutions
Let’s dive into the ingredients we’ll need to create these raspberry jam bars, along with some handy substitutions:
- 1 cup unsalted butter, softened: Keep it at room temperature for easy mixing. You can substitute with margarine if needed.
- 1/2 cup granulated sugar: For a healthier alternative, consider using coconut sugar or honey.
- 2 cups all-purpose flour: You can swap this with whole wheat flour or a gluten-free blend if you’re looking for a healthier option.
- 1/2 teaspoon salt: Enhances flavor; feel free to omit if you’re watching your sodium intake.
- 1 cup raspberry jam: Use store-bought or homemade jam; variations can include strawberry, blueberry, or apricot!
Pro Tips for Baking Success

Here are some expert insights to ensure your raspberry jam bars turn out perfectly every time:
- Room temperature butter: Ensures proper creaming with sugar, leading to a fluffy texture.
- Don’t overmix: Mix until ingredients just come together to avoid tough bars.
- Chill the dough: If the dough feels too soft, refrigerate for 15-30 minutes before pressing into the pan.
- Check the jam: Ensure your jam is spreadable and not too thick or runny for the best results.
- Watch the baking time: Keep an eye on your bars to prevent overbaking, which can dry them out.
- Let cool completely: Allow the bars to cool in the pan for ease of cutting.
- Use parchment paper: This helps with easy removal and cleanup.
- Experiment with toppings: Consider sprinkling powdered sugar or drizzling melted chocolate on top for an extra touch.
Common Mistakes and Troubleshooting
Even the best bakers make mistakes! Here are common pitfalls and how to avoid them:
- Too crumbly dough: If the dough is too crumbly, try adding a tablespoon of cold water or another tablespoon of softened butter.
- Jam leaks: If your jam runs out during baking, make sure to leave a little space along the edges when spreading.
- Bars stick to the pan: Always grease and line your pan with parchment paper to prevent sticking.
- Dry bars: Overbaking can lead to dryness; always check for doneness a few minutes before the suggested time.
Delicious Variations to Try
Want to mix things up? Here are some fun variations to try:
- Chocolate Raspberry Bars: Add chocolate chips to the dough for a delicious twist.
- Nutty Crumble Bars: Mix in chopped nuts like almonds or walnuts for added crunch.
- Berry Medley Bars: Use a mix of different jams or fresh berries for a fruity explosion.
- Coconut Lime Bars: Add shredded coconut and lime zest for a tropical flavor.
Storage and Make-Ahead Instructions
Want to prepare these delicious bars in advance? Here’s how:
- Storing: Keep the bars in an airtight container at room temperature for up to 3 days. For longer storage, place them in the refrigerator for up to a week.
- Freezing: You can freeze the bars for up to 3 months. Just make sure they’re well-wrapped in plastic wrap and then in foil.
- Make-Ahead: Prepare the dough in advance and refrigerate it overnight. When you’re ready to bake, just press it into the pan and add the jam!
Frequently Asked Questions
Got questions? Here are some common queries about raspberry jam bars:
- Can I use other fruits instead of raspberry? Absolutely! Any fruit jam will work well, like strawberry, apricot, or mixed berry.
- What if my jam is too thick? Gently heat it in the microwave for a few seconds to make it easier to spread.
- Can I make this recipe vegan? Yes! Substitute butter with coconut oil and use a flax egg instead of a regular egg.
- How do I know when my bars are done baking? The top should be golden brown, and the jam should be bubbly.
- Can I add spices? Yes! A pinch of cinnamon or vanilla extract can elevate the flavor.
- What’s the best way to cut the bars? Use a sharp knife and cut them after they have cooled completely for clean edges.
- Can I use frozen raspberries? Yes, but make sure to thaw and drain them before use.
- What do I serve with raspberry jam bars? They’re delicious on their own, but a scoop of vanilla ice cream or whipped cream pairs wonderfully!
Nutritional Tips and Dietary Adaptations
Here’s how to make your raspberry jam bars fit into various dietary needs:
- Low Sugar Option: Use sugar substitutes or natural sweeteners like stevia or monk fruit.
- Gluten-Free: Replace all-purpose flour with a gluten-free flour blend.
- Dairy-Free: Use dairy-free butter or coconut oil.
- Protein Boost: Add a scoop of protein powder to the dough for an extra nutritional kick.
Essential Equipment for Success
Here’s what you’ll need to make these bars:
- 9×9-inch baking pan: Ensures even baking and proper size for the bars.
- Mixing bowls: A large bowl for mixing the butter and sugar, plus another for dry ingredients.
- Hand mixer or stand mixer: For effortless mixing; a whisk can work, too, but it requires more effort.
- Parchment paper: Makes for easy removal of the bars and quick cleanup.
- Wire rack: Ideal for cooling the bars completely before cutting.
Serving Suggestions
These raspberry jam bars are delicious on their own, but here are some serving ideas to elevate them:
- Dust with powdered sugar: A light sprinkle adds a beautiful touch and extra sweetness.
- Serve warm with ice cream: A scoop of vanilla ice cream makes for a delightful dessert.
- Pair with coffee or tea: These bars make a perfect afternoon snack alongside your favorite beverage.
- Add fresh fruit: Top with fresh raspberries or strawberries for a pop of color and flavor.
Now that you have all the tips, tricks, and variations, it’s time to roll up your sleeves and get baking! I hope you enjoy making these raspberry jam bars as much as I do. Remember, the kitchen is a space for creativity and joy. So embrace the process, laugh at any mishaps, and most importantly, savor every delicious bite. Happy baking!
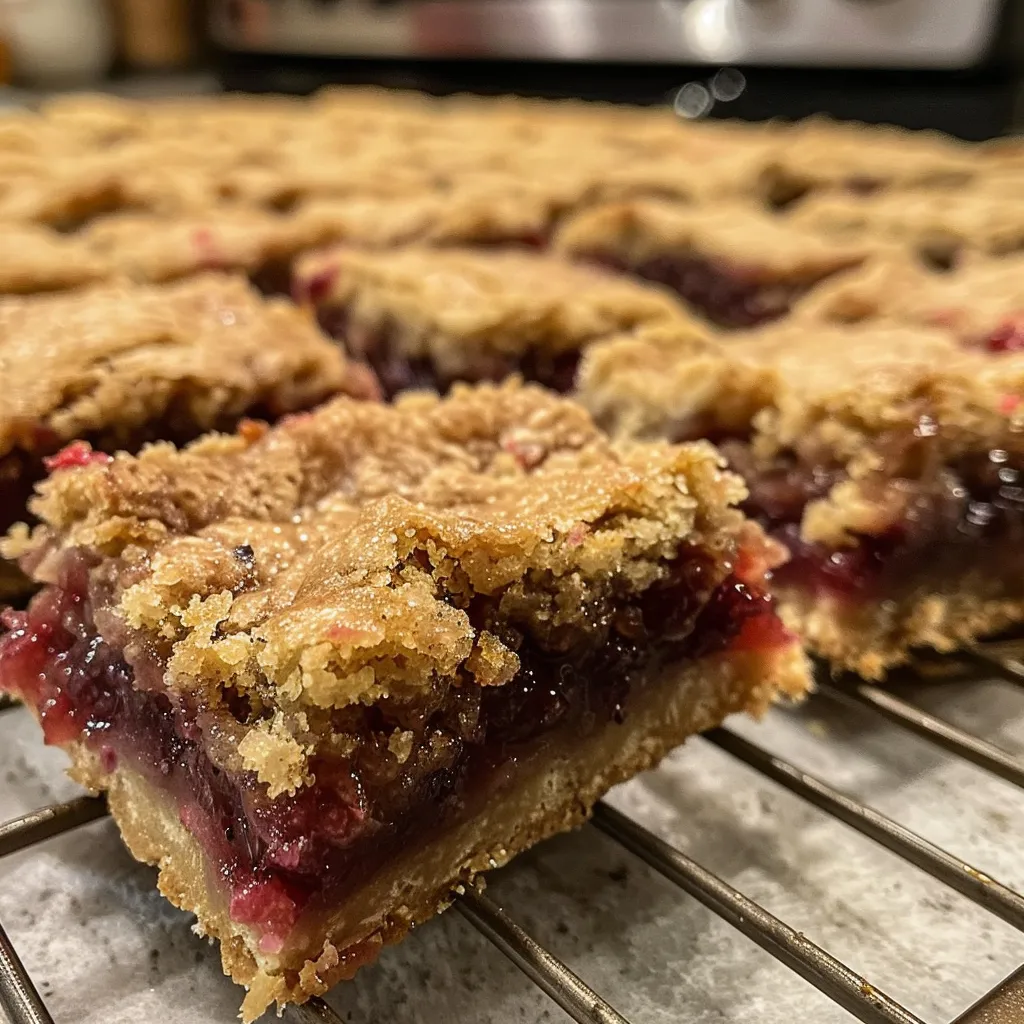
Raspberry Jam Bars
Ingredients
Dough and Crust
- 1 cup unsalted butter, softened
- 1/2 cup granulated sugar
- 2 cups all-purpose flour (see notes)
- 1/2 teaspoon salt
Filling
- 1 cup raspberry jam
Instructions
- Preheat oven to 350°F (175°C). Grease and line a 9x9-inch pan.
- Beat butter and sugar until fluffy. Mix in flour and salt until crumbly.
- Press about 2/3 of dough into the pan. Spread jam evenly over it.
- Crumble remaining dough on top. Bake for 25-30 minutes until golden.
- Cool completely, then slice into squares and serve.