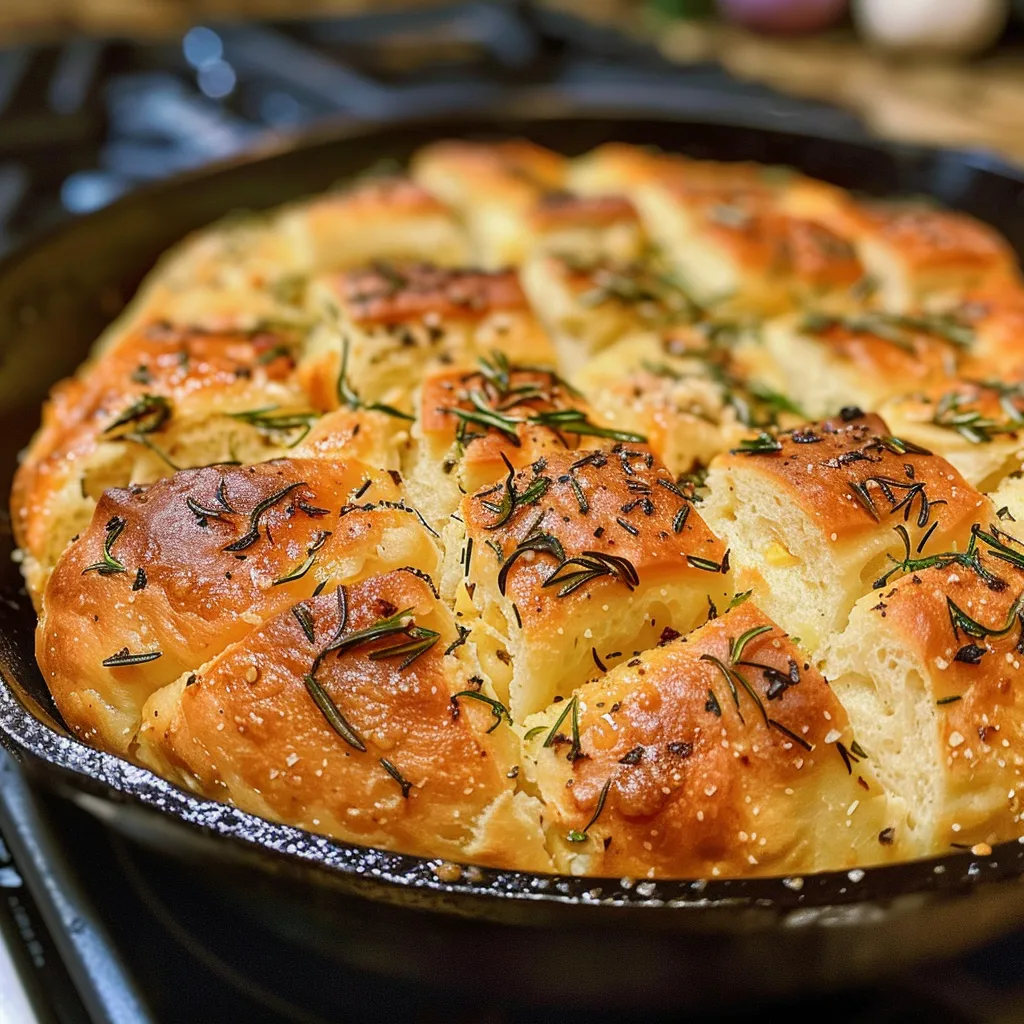
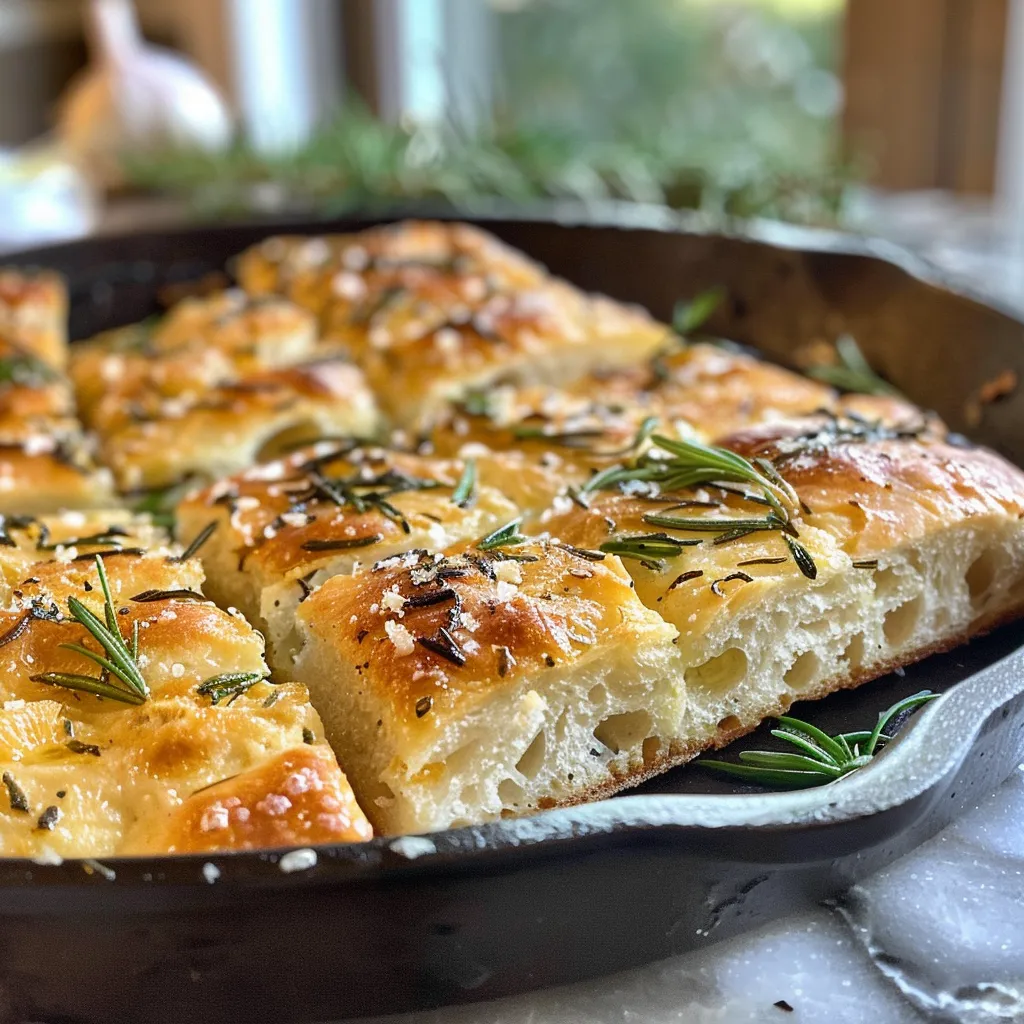
Welcome to the Joy of Baking: Rustic Garlic Rosemary Skillet Bread
Are you ready to embrace the comforting aroma of freshly baked bread wafting through your kitchen? Baking can be a joyful experience, especially when it involves creating something as delightful as Rustic Garlic Rosemary Skillet Bread. This easy recipe not only fills your home with warmth and delicious scents but also makes for a perfect accompaniment to any meal. Let’s dive into the world of baking together and transform simple ingredients into a mouthwatering masterpiece!
Why You’ll Love This Recipe
- Heavenly Aroma: The combination of garlic and rosemary creates an irresistible fragrance that fills your kitchen, making it a warm and inviting space.
- Simple Ingredients: Using just a few everyday ingredients, you can create a gourmet-style bread that impresses family and friends.
- Versatile Pairing: This bread pairs beautifully with soups, salads, or even on its own with a drizzle of olive oil for dipping.
- Perfect for Sharing: Homemade bread is always a hit at gatherings, bringing people together over shared flavors and stories.
- Stress Relief: Kneading dough can be a therapeutic experience, allowing you to unwind while creating something delicious.
Ingredients You’ll Need
Gathering the right ingredients is the first step to baking success. Here’s what you’ll need to make Rustic Garlic Rosemary Skillet Bread:
- 2 cups (240 g) all-purpose flour: The base for the bread; you can substitute with whole wheat flour for a heartier texture.
- 1 tsp salt: Enhances the overall flavor of the bread.
- 1 tsp instant yeast: The magic ingredient that causes the dough to rise.
- 1 cup (240 ml) warm water: This should feel comfortably warm to the touch, around 105°F (40°C).
- 2 tbsp olive oil: Adds richness and moisture to the bread.
- 4 cloves garlic, minced: Infuses the bread with a lovely garlic flavor.
- 2 tbsp fresh rosemary, chopped: Provides aromatic notes and elevates the flavor profile.
How to Make Rustic Garlic Rosemary Skillet Bread
Let’s get our hands a little floury! Follow these easy steps to create your bread from scratch:
- Mix the Dry Ingredients: In a large mixing bowl, whisk together the all-purpose flour, salt, and instant yeast.
- Combine with Water: Warm the water until it feels comfortably warm, then pour it into the flour mixture. Stir until a shaggy dough forms.
- Let the Dough Rise: Cover the bowl with a damp kitchen towel and let it rise in a warm area for about 1 to 2 hours, or until it has roughly doubled in size.
- Prepare the Garlic Infusion: In a small skillet, heat the olive oil over medium heat. Add the minced garlic and sauté until fragrant (about 2 minutes). Stir in the chopped rosemary and set aside to cool.
- Incorporate Flavors: Once the dough has risen, turn it out onto a floured surface. Shape it into a rough ball and pour the cooled garlic-rosemary infusion over the top, folding the dough to incorporate the flavors.
- Shape and Second Rise: Form the dough into a round loaf and place it into a well-oiled cast-iron skillet. Cover and let it rest for another 30 minutes.
- Preheat the Oven: About 10 minutes before the second rise is complete, preheat your oven to 400°F (200°C).
- Bake the Bread: Bake for 25-30 minutes, or until the bread is golden brown and sounds hollow when tapped.
- Cool and Serve: Allow the bread to cool in the skillet for a few minutes before transferring it to a wire rack. Slice and serve warm.
Pro Tips for Baking Success
Here are some expert insights to ensure your bread turns out perfectly every time:
- Use Fresh Ingredients: Make sure your yeast is fresh for the best rise. If it’s old, your bread may not rise as expected.
- Temperature Matters: Ensure your water is at the right temperature for activating the yeast—too hot can kill it.
- Patience is Key: Allow the dough to rise fully; rushing this step can lead to dense bread.
- Experiment with Flavors: Feel free to add other herbs or spices to the dough for a personalized twist.
- Check for Doneness: The bread should be golden brown on top and sound hollow when tapped on the bottom.
- Use a Thermometer: For optimal results, use a thermometer to check the bread’s interior temperature—it should be around 190°F (88°C).
- Keep it Covered: During the second rise, keep the dough covered to prevent it from drying out.
- Let It Rest: Let the bread cool for a few minutes before slicing to maintain its structure and moisture.
Common Mistakes & Troubleshooting
Even seasoned bakers can face hiccups. Here’s how to troubleshoot common issues:
- Dough Won’t Rise: Check that your yeast is active. If unsure, test it by mixing it with warm water and a bit of sugar. It should bubble after a few minutes.
- Dense Bread: This can happen if the dough was not kneaded enough or the flour was packed too tightly. Gently fluff your flour before measuring.
- Overbaked Bread: If your bread is too hard, reduce the baking time or lower the oven temperature slightly.
- Too Much Flour: If the dough is too dry, add a tablespoon of water at a time until it reaches the right consistency.
Flavor Variations to Try
Want to mix things up? Here are a few variations to consider:
- Cheesy Delight: Add shredded cheese (like mozzarella or cheddar) into the dough for a cheesy twist.
- Herbed Infusion: Experiment with different herbs such as thyme, parsley, or even a pinch of red pepper flakes for heat.
- Sundried Tomato & Basil: Fold in chopped sundried tomatoes and fresh basil for a Mediterranean spin.
- Sweet Twist: Replace garlic with cinnamon and add a bit of sugar for a sweet version that pairs nicely with breakfast.
Storage & Make-Ahead Instructions
Here’s how to store your bread and make it ahead of time:
- Storing Leftovers: Keep the bread wrapped in plastic or in an airtight container at room temperature for up to 2 days. For longer storage, freeze it.
- Freezing Bread: Slice the bread and wrap it tightly in foil or plastic wrap, then place in a freezer bag. It can last up to 3 months.
- Thawing: To thaw, place the bread at room temperature or reheat slices in the oven.
- Make-Ahead Option: You can prepare the dough and let it rise overnight in the fridge. Just bring it to room temperature before shaping and baking.
FAQ: Your Baking Questions Answered
- Can I use whole wheat flour?: Yes, you can substitute all-purpose flour with whole wheat flour, but it may yield a denser bread.
- What if I don’t have fresh rosemary?: Dried rosemary can be used; just reduce the amount by half, as dried herbs are more potent.
- How can I get a crustier bread?: Try placing a pan of water in the oven while baking to create steam, which helps develop a crust.
- Is there a gluten-free version?: Yes, you can use a gluten-free flour blend, but the texture may differ.
- Can I add nuts or seeds?: Absolutely! Chopped nuts or seeds can be folded into the dough for added texture.
- What are some serving suggestions?: Enjoy it warm with butter, or serve it alongside your favorite soup or salad.
- Can I make this in a regular baking pan?: Yes, you can use any baking dish, but a cast-iron skillet gives the best results.
- How do I know when the bread is done?: The bread should be golden brown and sound hollow when tapped. Use a thermometer to check for an internal temperature of 190°F.
Nutritional Tips & Dietary Adaptations
This bread can easily accommodate various dietary needs:
- Vegan Option: This recipe is naturally vegan, as it doesn’t include any animal products.
- Low-Sodium Version: Reduce the salt to suit your dietary needs; just remember it will affect the flavor.
- High-Protein Boost: Consider adding protein-rich ingredients like chia seeds or using a protein-enriched flour.
Essential Equipment
Here’s what you’ll need to make this recipe:
- Mixing Bowl: A large bowl for combining your ingredients.
- Whisk: For mixing dry ingredients.
- Cast-Iron Skillet: Perfect for baking the bread, providing a lovely crust.
- Damp Towel: To cover the dough while it rises.
- Wire Rack: For cooling the bread after baking.
Serving Suggestions
Pair your freshly baked Rustic Garlic Rosemary Skillet Bread with:
- Soups: Tomato basil soup, creamy chowder, or minestrone.
- Salads: A fresh garden salad or a hearty Caesar salad.
- Dips: Olive oil with balsamic vinegar, hummus, or a creamy cheese spread.
Now that you’ve mastered the art of baking Rustic Garlic Rosemary Skillet Bread, I can’t wait for you to share it with your loved ones. Remember, the kitchen is a place for joy and creativity, so don’t hesitate to experiment and make this recipe your own! Happy baking!
Rustic Garlic Rosemary Skillet Bread
Ingredients
Dough
- 2 cups all-purpose flour
- 1 tsp salt
- 1 tsp instant yeast
- 1 cup warm water
- 2 tbsp olive oil
Garlic and Rosemary
- 4 cloves garlic, minced
- 2 tbsp fresh rosemary, chopped
Instructions
- Mix flour, salt, and yeast in a bowl. Add warm water and stir until shaggy dough forms.
- Let dough rise in a warm place for 1-2 hours until doubled in size.
- Heat olive oil, sauté garlic until fragrant, then add rosemary and cool.
- Shape dough into a ball, pour garlic-rosemary infusion over, and fold to incorporate flavors. Let rest for 30 minutes.
- Preheat oven to 400°F (200°C). Shape dough into a round, place in oiled skillet, and bake for 25-30 minutes until golden.