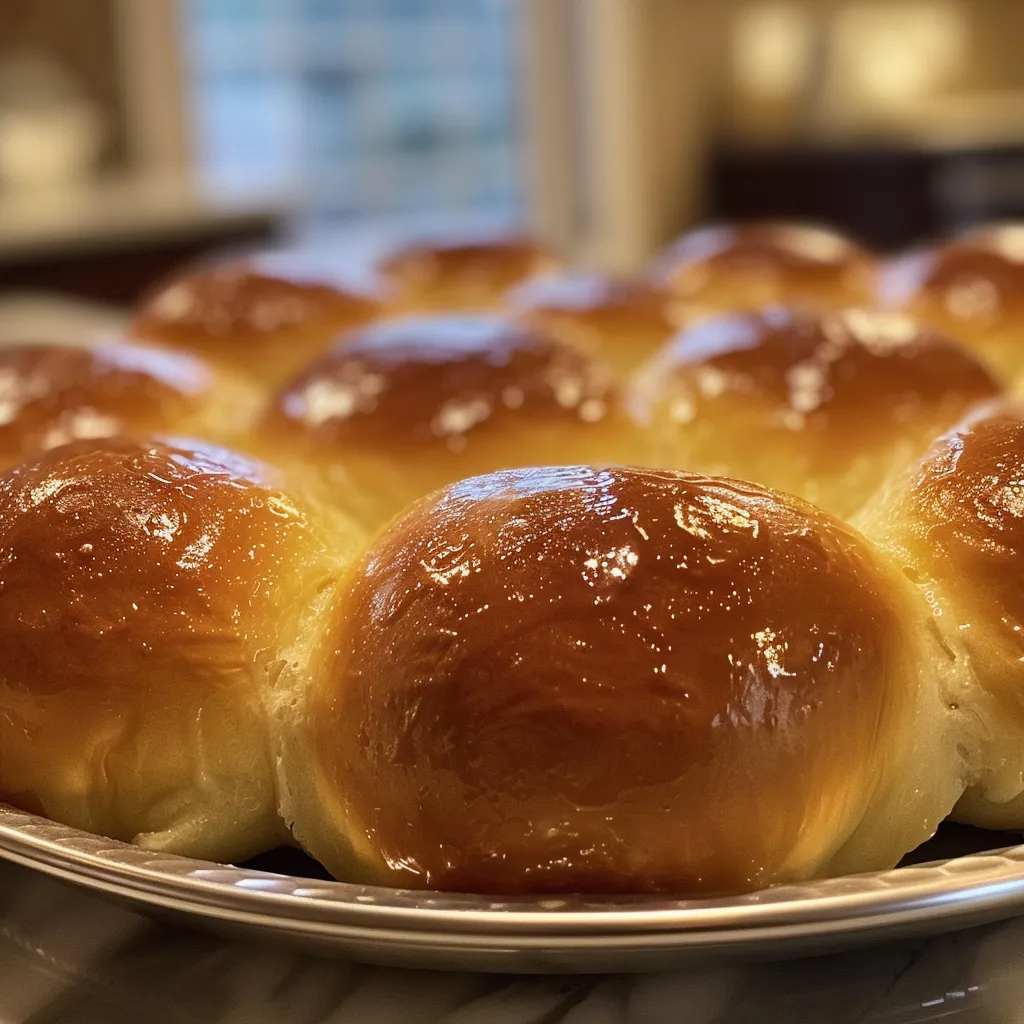
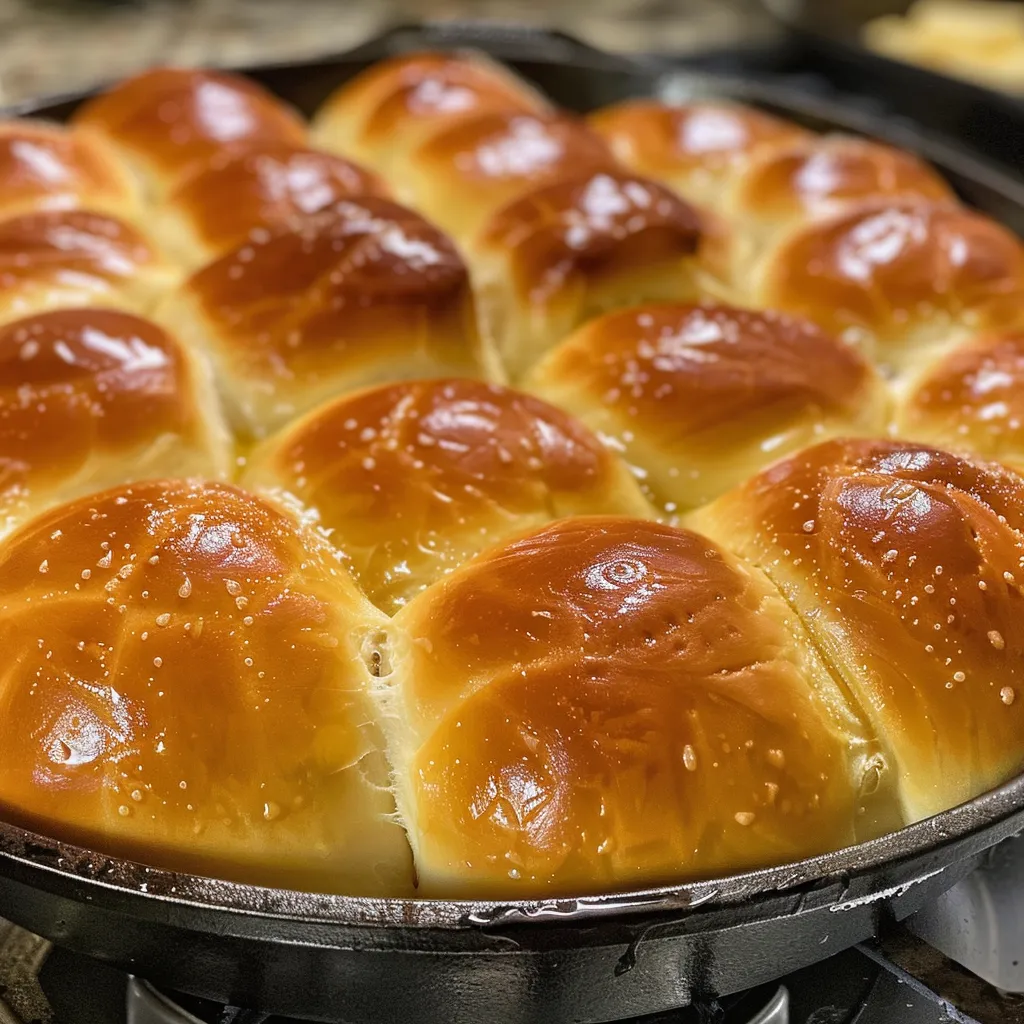
Get Ready for the Fluffiest Skillet Dinner Rolls Ever!
Welcome to the world of warm, fluffy skillet dinner rolls that will become the star of your dinner table! This skillet dinner roll recipe is not just easy to make but also a delightful experience that will fill your kitchen with mouth-watering aromas. Whether you’re hosting a big family dinner or just want a cozy night in, these rolls are perfect for every occasion. Let’s dive in and whip up these delicious rolls together!
Why You’ll Love This Recipe
Here are five reasons why this skillet dinner roll recipe is a must-try:
- Effortless Preparation: With simple ingredients and straightforward steps, even novice cooks can master this recipe.
- Perfectly Fluffy Texture: The combination of yeast and milk creates rolls that are incredibly soft and fluffy, making each bite a delight.
- Versatile Serving Options: These rolls pair beautifully with a variety of dishes—from soups to stews, or even as a base for sliders.
- Make-Ahead Friendly: You can prepare the dough in advance and bake them fresh right before serving, perfect for busy hosts!
- Customizable Flavors: Feel free to add herbs, cheese, or spices to the dough for a personalized twist!
Ingredients Breakdown
Here’s what you’ll need to whip up these delightful rolls, along with some handy substitutions:
- 2 packets active dry yeast (total 1/2 oz or 14 g + 1 tablespoon sugar): If you don’t have active dry yeast, feel free to use instant yeast instead, but skip the proofing step.
- ¼ cup warm water: This helps activate the yeast, making it bubbly and ready to work its magic.
- 1¼ cups milk: Whole milk is recommended for richness, but you can substitute with almond or soy milk for a dairy-free option.
- 5 tablespoons sugar: This not only sweetens the rolls but also feeds the yeast for a better rise.
- ¾ teaspoon salt: Essential for flavor balance.
- ¼ cup unsalted butter: Melted, for richness. You can use coconut oil for a dairy-free option.
- 4½ cups all-purpose flour (sifted): Make sure to sift for a lighter texture. For gluten-free options, use a 1:1 gluten-free flour blend.
- 1 large egg: This helps bind the rolls together and adds richness.
- Baking spray: To prevent sticking in your skillet.
- 1 teaspoon kosher salt: For sprinkling on top before baking.
- 3 tablespoons unsalted butter (melted): To brush on top for a beautiful shine and flavor.
Step-by-Step Instructions
Now, let’s get baking! Follow these simple steps to create your skillet dinner rolls:
- Dissolve the yeast and sugar in warm water and let it sit for about 5-10 minutes until it becomes frothy.
- In a saucepan, heat the milk with the sugar, salt, and butter until it’s lukewarm (not hot!).
- Add the egg to the yeast mixture, followed by the milk mixture. Stir well to combine.
- Gradually add all of the flour, mixing until a dough forms. Cover the dough and let it rest for 15 minutes.
- Using a stand mixer with a dough hook, knead the dough for about 5 minutes until smooth and elastic.
- Preheat your oven to 375°F (190°C).
- On a floured surface, roll out the dough and divide it into 18 equal-sized balls (about the size of small tennis balls).
- Cover the dough balls and let them rise for 25 minutes.
- Spray a 10-inch cast-iron skillet with baking spray, and arrange the dough balls in the skillet, packing them closely together.
- Sprinkle the kosher salt evenly over the surface, then bake for 10-12 minutes, or until golden brown.
- Brush with melted butter right after they come out of the oven and serve warm!
Pro Tips for Perfect Rolls
Here are some expert insights to ensure your rolls turn out perfectly every time:
- Check Your Yeast: Always make sure your yeast is fresh. If it doesn’t foam when mixed with warm water, it’s no longer active.
- Room Temperature Ingredients: Let your milk and egg come to room temperature for better mixing and rising.
- Don’t Overwork the Dough: Knead just until smooth; overworking can lead to dense rolls.
- Warm Environment: If your kitchen is cool, consider placing the dough in a warm spot to encourage rising.
- Cover the Rolls: While they rise, cover them with a damp cloth to prevent drying out.
- Experiment with Flavors: Try adding garlic powder, herbs, or cheese to the dough for a unique twist!
- Brush with Garlic Butter: For an extra flavor boost, mix minced garlic into the melted butter for brushing.
- Use a Digital Thermometer: The internal temperature of the rolls should be around 190°F (88°C) when they are done.
Common Mistakes and Troubleshooting
If you run into issues while making your rolls, here are some common mistakes and how to fix them:
- Dough Not Rising: This could be due to inactive yeast or a too-cool environment. Ensure your yeast is fresh and try placing the dough in a warmer location.
- Dense Rolls: Over-kneading can cause this. Remember to knead just until smooth and elastic.
- Burnt Tops: If the tops are browning too quickly, cover them loosely with foil during baking.
- Too Dry: A dry dough can result from too much flour. Always measure flour correctly and err on the side of less rather than more.
Delicious Variations
Want to switch things up? Here are some fun variations to try:
- Herb-Infused Rolls: Add dried herbs like rosemary or thyme to the dough for a fragrant twist.
- Cheesy Rolls: Incorporate shredded cheese directly into the dough or place a cube of cheese in the center of each dough ball.
- Sweet Rolls: Mix in cinnamon and sugar for a cinnamon roll vibe; consider adding a cream cheese glaze for an indulgent treat.
- Garlic Parmesan Rolls: Brush the rolls with garlic butter before baking and sprinkle with grated Parmesan cheese.
Storage and Make-Ahead Instructions
Want to make these rolls in advance? Here’s how to store and prepare them:
- Unbaked Rolls: Prepare the dough and shape into balls. Place them in the skillet, cover, and refrigerate overnight. Let them rise for about 30 minutes before baking.
- Baked Rolls: Store baked rolls in an airtight container at room temperature for up to 2 days. Reheat in the oven before serving for a fresh taste.
- Freezing: Freeze unbaked rolls by placing them on a baking sheet until frozen, then transfer to a freezer bag. Bake directly from frozen, adding a few extra minutes to the baking time.
Frequently Asked Questions
Here are some common questions about skillet dinner rolls:
- Can I use whole wheat flour? Yes, you can substitute half of the all-purpose flour with whole wheat flour for a healthier option.
- What if I don’t have a cast-iron skillet? You can use any oven-safe baking dish, but the rolls may not brown as nicely.
- Can I add herbs or spices to the dough? Absolutely! Experiment with flavors to match your meal.
- How do I know when the rolls are done? They should be golden brown on top and sound hollow when tapped.
- Can I make these rolls dairy-free? Yes, simply substitute the milk and butter with plant-based alternatives.
- What’s the best way to reheat leftover rolls? Wrap them in foil and warm them in the oven for a few minutes.
- Can I double this recipe? Yes, just ensure you have a large enough mixing bowl and baking dish!
- How long do these rolls last? They are best enjoyed fresh but can be kept for up to 2 days at room temperature.
Nutritional Tips and Dietary Adaptations
For those looking to make healthier choices, here are some nutritional tips:
- Reduce Sugar: Cut down the sugar by half for a less sweet roll.
- Use Whole Grains: Incorporate whole wheat flour or a nut flour blend to boost fiber content.
- Portion Control: Consider making smaller rolls to help manage serving sizes.
Equipment Recommendations
Here are some tools that can help you make the best skillet dinner rolls:
- Stand Mixer: For effortless kneading and mixing.
- Cast-Iron Skillet: Ideal for even baking and beautiful presentation.
- Measuring Cups and Spoons: Accurate measurements are key for baking success.
- Kitchen Towel: For covering dough while it rises.
Serving Suggestions
These rolls can elevate any meal! Here are a few ideas for serving:
- With Soups and Stews: Perfect for soaking up delicious broths.
- As Sliders: Use them for mini sandwiches with your favorite fillings.
- With Dips: Serve alongside hummus, spinach dip, or a cheesy spread.
- For Breakfast: Enjoy them toasted with jam or butter for a delightful morning treat.
There you have it! Your ultimate guide to making the fluffiest skillet dinner rolls that are sure to impress. Remember, cooking is all about having fun and being creative, so don’t worry if things don’t go perfectly at first. Every great cook started somewhere, and I’m here cheering you on every step of the way. Happy baking!
Skillet Dinner Rolls
Ingredients
Yeast and Sugar
- 0.5 oz active dry yeast (2 packets)
- 1 tablespoon sugar
Liquid Mixture
- 0.25 cup warm water
- 1.25 cups milk
- 5 tablespoons sugar
- 0.75 teaspoon salt
- 0.25 cup unsalted butter
Dough
- 4.5 cups all-purpose flour (sifted)
- 1 large egg
Topping and Baking
- baking spray baking spray
- 1 teaspoon kosher salt
- 3 tablespoons unsalted butter (melted)
Instructions
- Dissolve yeast and sugar in warm water; heat milk with sugar, salt, and butter until lukewarm.
- Add egg to yeast mixture; combine with milk mixture and flour. Rest for 15 minutes, then knead for 5 minutes.
- Preheat oven to 375°F (190°C). Shape dough into 18 balls, let rise 25 minutes, then arrange in a greased skillet. Sprinkle with salt and bake for 10–12 minutes. Brush with melted butter and serve warm.