Are you ready to elevate your snacking game? I absolutely love whipping up quick and delicious bites that not only satisfy my cravings but also impress my family and friends. Today, I’m excited to share my recipe for Sriracha Ranch Tuna Cups. These little delights are perfect for a quick snack or appetizer, and they come together in no time! Plus, they fit right in with my collection of easy pasta recipes and 30-minute meals that make weeknight dinners a breeze.
Why You’ll Love This Recipe
- Quick and easy to prepare, making it perfect for busy weeknights.
- Flavorful combination of creamy ranch and spicy Sriracha.
- Great for meal prep or as a last-minute appetizer for gatherings.
- Healthy and satisfying, packed with protein from tuna.
- Versatile – customize with your favorite toppings!
Ingredients
To make these scrumptious Sriracha Ranch Tuna Cups, you’ll need the following ingredients:
- 1 can of tuna, drained
- 1/4 cup ranch dressing
- 1-2 tablespoons Sriracha (adjust to your spice preference)
- 1/4 cup diced celery
- 1/4 cup diced red onion
- 1/4 cup shredded cheese (cheddar or your choice)
- 1 package of mini phyllo cups or tortilla chips
- Fresh cilantro or parsley for garnish (optional)
Full ingredient list with measurements is provided in the printable recipe card below.
How to Make the Recipe
Now, let’s dive into the fun part – making these Sriracha Ranch Tuna Cups!
- In a medium bowl, combine the drained tuna, ranch dressing, and Sriracha. Mix well until the tuna is fully coated.
- Add the diced celery and red onion to the bowl, stirring until evenly distributed.
- Gently fold in the shredded cheese for an extra creamy texture.
- Take your mini phyllo cups or tortilla chips and fill each one generously with the tuna mixture.
- Garnish with fresh cilantro or parsley if desired.
- Serve immediately, or chill in the fridge for 30 minutes to let the flavors meld.
Pro Tips for Making the Recipe
Here are some of my favorite tips to ensure your Sriracha Ranch Tuna Cups turn out perfectly:
- For a milder flavor, reduce the amount of Sriracha or use a milder hot sauce.
- Feel free to add other ingredients like diced bell peppers or olives for extra flavor and texture.
- If you’re short on time, you can use pre-made tuna salad as a base and just add the Sriracha and ranch dressing.
- These cups can be made ahead of time and stored in the fridge for up to 2 days.
How to Serve
These Sriracha Ranch Tuna Cups are incredibly versatile! Here are some serving suggestions:
- Serve them as a fun appetizer at your next gathering or party.
- Pair them with a fresh salad for a light lunch.
- Enjoy them as a quick snack while watching your favorite show.
- They also make a great addition to a charcuterie board!
Make Ahead and Storage
If you’re like me and love to plan ahead, you’ll be happy to know that these tuna cups can be made in advance! Here’s how to store them:
- Prepare the tuna mixture and store it in an airtight container in the fridge for up to 3 days.
- Fill the phyllo cups or chips just before serving to keep them crispy.
- If you have leftovers, store them in the fridge for up to 2 days, but keep in mind that the cups may become soggy.
These Sriracha Ranch Tuna Cups are not only a delightful snack but also a fantastic addition to your repertoire of weeknight dinner ideas. They’re quick to make, packed with flavor, and sure to please everyone at the table. So, gather your ingredients and give this recipe a try today! You won’t regret it!
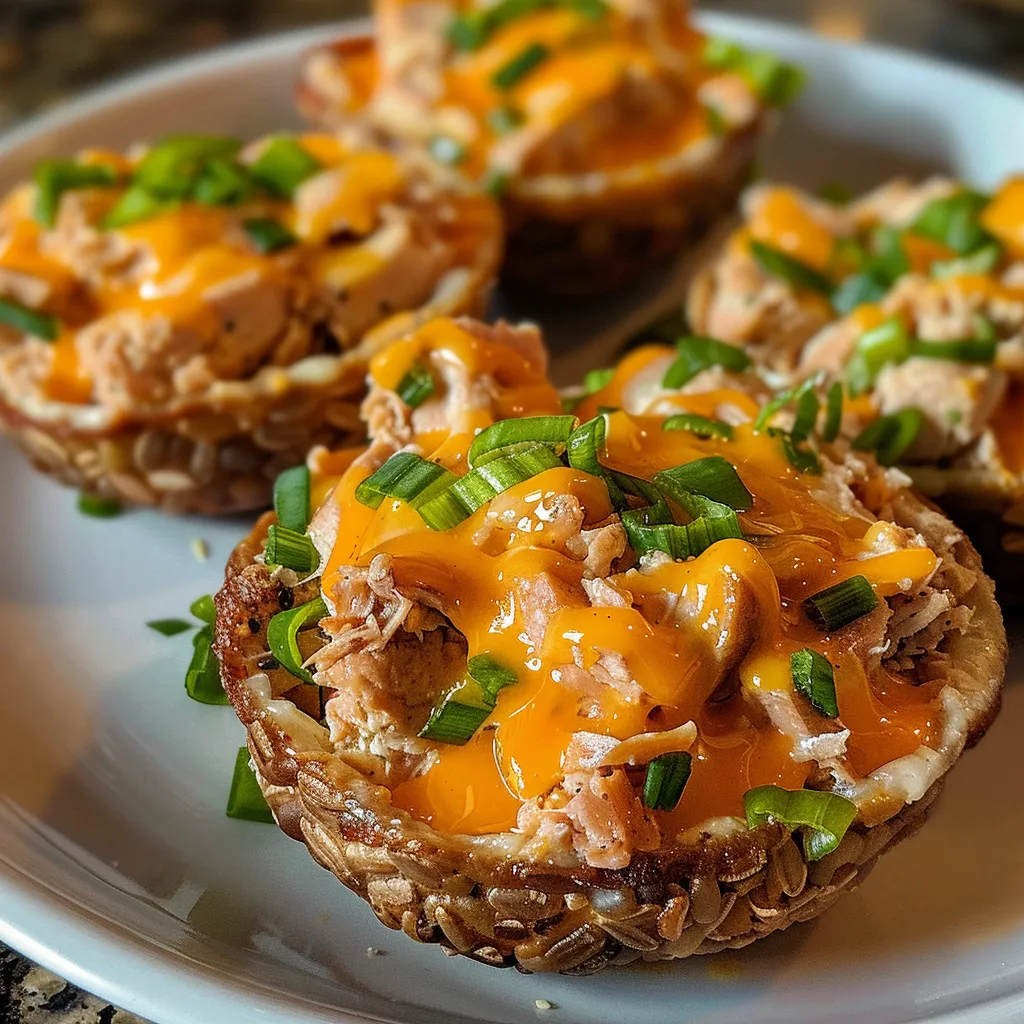
Sriracha Ranch Tuna Cups
Ingredients
Canned Goods
- 2 cans Tuna (10 Ounces)
- 1 large Whole Egg
Dressing & Sauces
- 2 tablespoons Ranch Dressing (Fat Free)
- 4 teaspoons Chili Sauce (Sriracha)
Dry Ingredients
- 8 tablespoons Wheat Germ
- 1 yellow onion Yellow Onion (Your Choice)
- 1 teaspoon Italian Seasoning
- 0.25 cup Cheddar Cheese (Reduced Fat Mild)
- 0.125 cup Cheddar Cheese (Reduced Fat Mild (For Topping))
Instructions
- Drain the tuna and chop the onion.
- Mix all ingredients except topping cheese in a large bowl.
- Distribute mixture into 4 baking dishes and top with cheese.
- Bake at 350°F (176°C) for 20 minutes.